
Abilities Build


Muriel Guide
Disclaimer
Before I start, this is just my thoughts and interpretations on Muriel and how she should be played. Don’t take everything stated as factual, there’s still a lot of room as the game expands for developments and mindsets.
Introduction:
Muriel exists as a Support using spells and shields to aid her allies. She functions through utility as you’d expect from a caster support. Her main focus is damage mitigation through shields (RMB, E, R) and movement speed boosts (RMB) with some focus into zone control (E, R) and crowd control (Q, R).
Muriel’s Base Stats:
Max Health: 500 (+100 per level)
Health Regen: 1 (+0.2 per level)
Max Mana: 200 (+25.5 per level)
Mana Regen: 0.8 (+0.1 per level)
Physical Armor: 6 (+0.6 per level)
Energy Armor: 6 (+0.6 per level)
Attack Speed: 100 (1.4 per level)
(For the Health/Mana regen, I’m uncertain as to whether Max Health/Mana play a part in it.)
Spells:
Passive – Clutch Save
“Muriel grants bonus health regen aura to nearby shielded allies. The health regen aura applies to any ally with a shield from any source.”
Health Regen: 14 Health per Second
This is Muriel’s passive and it works with 3 of your spells (RMB, E and R). It’s nothing too noticeable but throughout the duration of a laning phase it helps a little with sustain. The fact that it allows it to work as an aura rather than just shields provided by Muriel allows it work with heroes such as Feng Mao (RMB), Steel (E), and has the potential for when a card exists that provides a shield.
With its base regeneration being 14 per second, this mirrors a health potion in concentration which is quite substantial early game. If for example, you were to use your E three times during laning phase, that’s the same as using a health potion.
LMB – Orb
“Long range, low damage attack.”
Energy Damage: 49.95/56.19/62.43 (+37.5% Energy Damage)
Range: ?
Attack speed: 1.5/1.48/1.46
There’s nothing special to be mentioned about Muriel’s basic attack. Make sure to weave it between spells when trading as the damage will rack up over time. In lane you can cast it as your enemies are going for last hits as they shouldn’t be able to trade with you since they’re stuck in their auto attack animation. I would never put points into this.
RMB – Boots
“Fires an orb toward your reticle. If Muriel or an ally pick up the orb, they are shielded and gain a burst of movement speed.”
Cooldown: 15 seconds (9 seconds at 40% CDR, 6 seconds at 60% CDR)
Mana Cost: 52/56/60
Shield: 135/310/465
Shield Duration (On hero): 2 seconds
Shield Duration (On ground): 8 seconds
Move Speed Increase: 200/250/300
Move Speed Duration: 2 seconds
Range: Pretty ridiculous
This is my main reason for liking her so much. It allows you to do so much and come late game where you have a lot of Cooldown Reduction, it can really help with damage mitigation and manoeuvrability in team fights. It starts at a base of 135 and scales by very well per rank up so you really want to level this whenever you can because I feel it’s one of the main reasons for taking Muriel in the first place. It does come with a heavy mana cost so you don’t want to waste this unless you’re doing a strong trade in lane which if used properly should generally put you ahead. Do note it’s range is really far so when aiming you generally just want to aim straight towards your target, rather than leaving it for them to pick up as it makes it unreliable.
Q – Drain
“Muriel fires out a projectile in a line that passes through all enemies hit. Any enemies hit are slowed and take damage. Stops at heroes.”
Energy Damage: 75/105/135/165/195 (+75% Energy Damage)
Slow Duration: 4 seconds
Slow Amount: -120 (Could vary per level in future)
Range: ?
Cooldown: 15 seconds (9 seconds at 40% CDR, 6 seconds at 60% CDR)
Mana Cost: 52/56/60/64/68
Drain is Muriel’s Q and it is a tool used to help catch and kite the enemy. It enhances your next auto attack to do increased damage and slow the target’s hit. It does reasonable damage to say you’re not building Energy Damage and the 4 second slow is very strong. It should be used in trades in lane as the slow will allow your laner to trade easier.
You can use this to help shove the minion wave with an ally to get it to the turret as the Q pierces minions. Something you can do is Q and LMB straight after to somewhat hide/cancel the animation. When it comes to team fights, make sure your priorities are straight. Just because a tank is hard to kill, it does not mean you should ignore him.
Slowing the diver makes his job more difficult whilst allowing your allies to get more damage off as they’re more fixated on that area.
E – Consecrated Ground
“Muriel creates an AoE bubble that applies a shield to friendly heroes. At the end of the ability, the bubble collapses, damaging enemy heroes in it.”
Energy Damage: 60/90/120/150/180 (+25% Energy Damage)
Shield: 100/152/204/256/308
Duration (On ground): 2 seconds
Shield Duration (On Allies): 5 seconds
Cooldown: 18/17/16/15/14 seconds (8.4 seconds at 40% CDR, 5.6 seconds at 60% CDR)
Mana Cost: 56/60.5/65/69.50/74
Muriel’s E is an AoE shield and damage zone. It shares the same cooldown as your RMB so choosing to use one over the other in combat should determine on the circumstance. The shield isn’t as large as RMB and/but it has a higher/lower mana cost. I max this second as it allows me create larger shields for my allies and create more threatening zones of control.
It doesn’t have CC unlike Dekkers E but it can act as having CC through psychology. If the enemy sees a large zone created by the enemy, the threat of it can act as CC as they can chose to not go through that zone which is fundamentally controlling where they go.
Depending on the fight I will use this first or use my RMB first and this is whether I’m shielding multiple allies from an attack, or if I’m helping the frontline engage with RMB. This can also be used to help shove waves with your carry as it generally leaves the minions low enough for them to get the last hits.
R – Reversal of Fortune
“Muriel targets an ally anywhere on the map. After a short delay she grants the ally a shield and will fly across the map to their location. Once Muriel arrives, she will knock enemies away and shield allies near her target.”
Shield: 450/575/700
Shield Duration: 3 seconds (5 seconds AoE test this)
Cooldown: 130/120/110
Mana Cost: 100
Knock-up Duration: 1.5 – 2 seconds (Not certain)
Muriel’s R is very distinctive at this current time as it is the only spell that has a global range and the ability to teleport across the whole map. It functions by the Muriel targeting an ally to which you then travel creating a shield on the chosen ally. Upon landing you create an AoE shield for your allies and an AoE knock-up which is determined by the chosen ally’s position. It can be used in many ways:
The first and most obvious is to aid an ally from across the map. This can be tricky if you’re playing solo as you can only make judgements based on their health.
The way I do it is I keep scanning the field and checking their/the enemy’s health bar to see if they’re trading. If I feel I can ult to help them live or secure the kill, that is when is do so.
The second is for following up the front line. This can be done in or out of vision as their isn’t much to counter it. If for example an ally Steel lands a 3 man ult, you can follow up by ulting him primarily for the follow up CC. This allows your team to secure more damage and should win you the fight.
Another use is for peeling. In the circumstance you’ve exhausted all of your cooldowns to keep the enemy team of your carries, you can ult your backline thus knocking the enemy to stop them dealing damage and shielding your team long enough so that hopefully, your other skills are off cool down.
The use I wouldn’t recommend is to get out of a sticky situation by ulting an ally just to escape. This is bad practice as you shouldn’t be out of position in the first place. But I understand that mistakes happen and the cooldown is rather short for how dynamic it is.
My final use and one which I’m not sure on is to bring the Prime Orb buff to the receiver. I’m not sure if this will prevail as there’s very little counterplay to it which would be frustrating to play against. I think it can be justified in the sense that you need to coordinate an ally to stand and wait at the receiver without being caught. It also relies on the enemy being unaware that the Prime Orb is being killed which should become less common once wards and vision control becomes common practice.
Spell Order:
Always put points into R whenever possible as is true for any hero. Then put points into RMB when putting points into R isn’t an option. Placing points into Q or E is situational (especially early game) but I prefer E as it’s true that putting points into Q increases its damage, it scales the same (30 each rank) as putting points into E yet E has a shield and a similar cooldown to Q making E the better option.
For level 1, now that you don’t start the game with RMB too, there’s the choice between Q, E and RMB. Depending on the lane/circumstance determines which skill I start. I tend to prefer Q as 75 damage is a lot (Muriel’s base health is 500 for example so that’s 15% from her, if we ignore energy resist) and the 4 second slow helps them from both escaping and allows you and your laner to do more damage.
Starting E is of course an option and is one I’ll try more as damaging multiple enemies for 60 and shielding multiple allies for 100 is much more efficient than hitting one enemy for 75. This is ignoring the slow from Q so it’s whether you value the slow over the AoE shield and damage. I would refrain from RMB at level 1 as it only shields one person. Not many champions can out damage the shield in time and it has the chance to miss (as does Q for that matter).
If you’re starting a camp with your Jungler or just you and your Ranger, it’s best to start E as the Shield will negate 100 damage from both you and your Ranger if you position and kite the mobs correctly.
TL;DR
R>RMB>E>Q>LMB
Starter Deck structure:
The starter deck is one everyone will use until granted the access to make their own at level 5. With this we can create priorities and practices for when we go and develop our own deck. We start the game with a Health Potion, Mana Potion and Scout’s ward. We can ignore Harvester’s Key as by the time we want the correct timing for creating the harvester, we’d have already purchased the Lord’s Key.
After Lord’s Key, I liked rushing the Pendulum of Lords as when this is maxed, it allowed me to get a further 2.5% CDR which is our goal on Muriel. If we were to max Lord’s Key we would receive no benefit. It is merely purchased for the active and the ability to purchase Mana and Cooldown reduction upgrades. If we only purchased CDR upgrades with these two cards until we run out, we’d end up with 30% Cooldown Reduction.
This means we need to find another 10% that exists in this deck. For this to happen, we need to purchase Chrono-Mancer twice, as the Upgraded bonus gives 5% each time. Now, I’m not saying this is the best way to build the deck, this is just how I like to build Muriel with this deck. If you value the passive from Circlet of Health then feel free to build that instead. I just think that CDR is simply invaluable.
Cards:
Prime:
- The Centurion (1,000 Max Health, 100% Bonus [Unique], Auea + 500 Max Health to minions)
Equipment:
- Health Potion
- Mana Potion
- Harvester’s Key
- Scout’s Ward
- Pendulum of Lords (75 Max Mana, 100 Max Health, 2.5% CDR – Fully Upgraded Bonus +2.5% CDR)
- Chrono-Mancer Disc x2 (75 Mana, 7.6 Energy Damage – Fully Upgraded Bonus 5% CDR)
- Staff of Adamant (7.6 Energy Damage, 100 Max Health – Fully Upgraded Bonus 15.2 Energy Damage)
- Lord’s Key (Harvester Placement 3s, 75 Max Mana, 100 Max Health, 2.5% CDR)
- Circlet of Health (75 Mana – Unique Passive Aura: Grants nearby allies 4.2 Health Regen)
Upgrades:
- Mana – x3
- Advanced Mana
- Health
- Greater Health x4
- Cast – x5
- Chrono – x3
- Advanced Chrono – x1
My Deck structure:
Before I talk about my deck, I want to explain why I made the choices I did. Let’s look at how Muriel functions and what she wants to achieve. She functions by the protecting allies through Shields, Crowd Control and Movement Speed boosts. The most consistent being her shields and is the main reason we max these spells first. With this in mind we must consider that these do not scale with stats such as Energy Damage or Health but rather than the level they’re at. Being able to use these spells more frequently will produce better results. This makes cooldown reduction the most important stat for Muriel and is one we purchase early (Do note cooldown reduction caps at 40% from items, 60% with blue buff). It also has effect on her other spells meaning more slows with Q and more Ults which is always fun.
The next stat is Mana (and Mana Regen), this is because in the absence of Mana, you’re essentially useless unlike other characters who function by auto-attacking. However, you don’t want to only focus on purchasing Mana as eventually it will become redundant in the sense you’re not out of base long enough/fights aren’t as frequent enough to fully expend your Mana pool.
I think that with consideration, it creates a good sense of direction on what to build on Muriel. (Do note this is just my interpretation and with the ambiguity of how specifically each ability works, it’s a little hard to make judgement with such certification).
Cards:
Prime:
- The Centurion (1,000 Max Health, 100% Damage Bonus [Unique], Aura +500 Max Health to Minions)
Equipment:
- Health Potion x1
- Mana Potion x1
- Scout’s Ward x1
- Lord’s Key (Harvester Placement 3s, 75 Max Mana, 100 Max Health, 2.5% CDR)
- Lord’s Ward (75 Mana, 100 Max Health, 2.5% CDR, UA Shadow Ward – 2 Charges)
- Lantern of Spring (16 Energy Pen, 22 Physical Armor, 2.5% CDR, Bonus 2.5% CDR)
- Venom Shell (22 Physical Armor, 7.6 Energy Damage, Bonus 15.2 Energy Damage)
- Tempered Plate (22 Physical Armor, 100 Max Health, Bonus 44 Physical Armor)
- Snakevine Mesh (22 Energy Armor, 7.6 Energy Armor, Bonus 15.2 Energy Damage)
- Tuned Barrier (22 Energy Armor, 100 Max Health, Bonus 44 Energy Armor)
Upgrade:
- Cooldown Reduction – 2x Cost 3, 4x Cost 2
- Max Health
- Max Mana
- Physical Armor
- Energy Armor
I feel that only a few cards are staple (CDR ones to be specific) and that the rest of the deck can be and should be left to the user’s interpretation. I personally like rushing 40% CDR so this deck allows me to build it faster whilst ignoring defensive stats for the first 15 – 20 minutes of the game. Just netdecking somebodies deck doesn’t allow you to understand the choices they made and ignores the possibility for a better deck to exist. In the upgrades section, I didn’t include specifics on each as it will vary from person to person as packs can be pretty random.
Build Order:
I always start Health and Mana pot with a Scout’s Ward on Muriel. There isn’t a card that currently exists that outweighs the 3 points spent. I did try using Honor of the Pure and it was horrible, one use of the Health potion is over double the +100 Health it gives you. The decision for the Ward over Harvester promotes the idea that by the time you’ve had your first base; you can afford a Key item which accelerates you into your build and is equal to the game time that you’re going to need the harvester key anyway. I also feel that the ward does more as the harvester is useless until the 3 minute mark, where as the ward can detect an enemy thus relieving pressure elsewhere on the map and thus allowing your team to make more aggressive decisions.
My current build order after the starter 3 points is rushing the two Lord Items, this gives me a Key and 3 wards to play with (2 from Lords Ward, 1 from Scouts Ward). From here, it depends on what card cards you have. You can maximise your CDR with these 2 cards being fully maxed. This is done by using a mixture of your CDR Upgrades (4x CDR 2 Cost, 2x CDR 3 Cost). This take 18 points (including Starter Items) to fully maximise your main stat leaving you with 42 cards to play with.
I say current because this can and will probably change in the future as I learn about more cards and change my mindset on how the game is played. Recently, I’ve been rushing the two Lord items and then getting the Lantern of Spring. The Lantern of Spring is a cute item which I’m growing to like more and more. By the time you’re buying this, you have two empty cards which some people will see as being inefficient which I can see why but don’t agree with. Maxing either of the Lord Items gives you nothing; the only reason they’re purchased is for the ability to buy CDR, Mana and for both of their functionalities. With this in mind, if we continue on with the deck without Lantern, we will never purchase any additional Mana which is a valued stat on Muriel.
The stats on Lantern consist of Energy Pen, Armor and CDR. Upon filling this card you gain a bonus 2.5% CDR, this is important for mazing you CDR with this route. It frees up a space in your deck as you don’t need the 4th 2 cost CDR upgrade. The Energy Pen is nice as by the time you purchase this, the base Energy Armor of the enemy heroes will be at around 8-10 which helps with the damage from your spells. The Armor is useful as in almost every game, at least one hero will be dealing Physical Damage (usually the enemy Ranger).
From here it’s dependant on the enemy composition. You either want to purchase Physical armor or Energy armor accordingly. I value Armor more than Health on Muriel as I’m constantly pumping out shields so the extra armor will give me more effective health. Not to say that health has no value, but with the fact you get 100 per Level and 100 from each Lord Item, you’re getting a nice amount without prioritising it.
One card I don’t own but read exists is the Alacritous Charm, what this does is “Whenever you cast an ability on an allied Hero, you and your target gain 15% Attack Speed and 30 Energy Damage on-hit for 6 seconds.” This sounds perfect for Muriel and I feel that it’s going to cost a lot of points. But depending on the stats it gives (CDR + Mana), I want to say that this could become standard.
Map Timings:
Eventually, there will become a time where there exists the most optimal and efficient way to play the game. At this current time, it’s hard to say that it exists now because the game is so new and the dynamics of how it wants to work are ever changing. The reason I can say that there will become a time where everything is optimised and efficient is because it is a game; the game is fixed in its state until the game ends. Now I’m not trying to say that I have this figured out or anything, that would be ludicrous. But I would like to share some thoughts on how the game could be played and the timings that exist to aid that focus.
Let’s look at the first 10 minutes of a game and make judgements of what can happen within that time. In this game we win by killing the Core or by the enemy team surrendering (this can occur at 15 minutes). In order for us to kill the prime, we need to kill the inhibitors which are guarded by 2 layers of turrets. In order to hit turrets we must either have minions tanking the turrets damage to allow us to hit it, or somebody can tank the damage if it’s possible to kill it in time/they can tank it long enough (looking at you Rampage). With this in mind, no kills need to happen in order to win a game. Now, don’t get me wrong, kills can help accelerate the game by a huge margin in some cases. I’m just saying that there should be some priority when it comes to decisions in game.
TL;DR
Turrets>Minions>Kills.
Game start
Minions start spawning at 30 seconds and it takes a minute and a minute and 5 seconds (Mid and Side lanes respectfully) in order for them to meet the enemy minions; this is also known as crashing. What does this mean? Well with the idea that it takes 30-35 seconds (assuming you buy your cards instantly) to get from base to the middle of the map, that leaves us with a minute before we actually need to be in lane ready to last hit. So what can we do? Well, we know we can’t push too far because tower diving at level 1 is highly inadvisable (never do it), so we should look to pressuring the jungle. We can do this by either invading their jungle as a group to create vision with wards (Red), or by defending your jungle by warding the entrances (Green). If your team isn’t coordinated and they’re not interested in invading as a group then the least you should do is ward and then leash for your jungler. If creating vision with wards, there are a few locations that are more optimal than others. A few that I like are the junctions in the jungle as this creates the most amount of vision and information as it tells you their sense of direction.
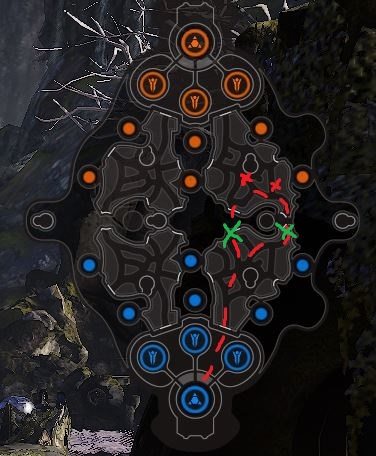 When going for either of these wards, you want to make sure that you purchase your cards as soon as possible. The idea is that the sooner you can make it out of base and placing the ward down, the safer it is for you to do the invade. You should aim to have the ward down by 40-50 seconds which gives you plenty of time to make it back to either aid your jungler on his camp or back to lane
When leashing your jungler, depending on the camp they start determines which skill you start. If they start Red buff (which is ideal atm) I highly recommend you starting E as the 5 second shield really helps with your junglers clear. With how much damage the red camp does, you should tank the hits until your shield depletes, then let your jungler take aggro as their shield should still be up.
You want to stay until they finish the red camp as you all share 600 CXP which is almost 3 Points before you start lane which is very strong.
Early game
After you’ve leashed for your jungler (if you did), you should be back in lane to commence laning phase. The focus here is to farm (last hit minions) with your ranger, deny your enemy laner farm, stay safe from enemy ganks and try and control vision and harvesters. You generally want to be auto attacking minions and the enemy laners when they’re in range to do so. Depending on what spell you started depends on how you want to poke at level 1.
If you started E, you can go for a heavier trade as your shield should compensate most of the damage they’re dealing whilst maintaining the same damage output onto them. This is somewhat advisable as dealing around 60 Energy Damage to the whole wave helps shove the lane which is what you want as hitting level 2 will be a large advantage for your lane. Achieving level 2 increases your base stats and gives you access to your 2nd skill which will grossly increase your lead.
If I started E I will generally go Q second as it allows me to keep up with the enemy if they’re retreating will generally result in a kill if I achieved level 2 first. I know I said that kills aren’t as important as last hitting minions which is true, but if you have the level and pressure advantage you should capitalize on it. If you do secure the kill, you should be very ahead by now as you’re both denying the enemy CXP and XP.
Plus, it allows you to last hit more freely without the pressure of being denied. If all goes to plan you should have three card points granted you stayed for the 600 CXP from the red camp which should allow you to buy the Lord’s Key. If you did not reach level 2 first and they shoved you when leashing your jungler, you should just stay near the turret and last hit until you can capitalize on a mistake.
Generally, you want to try and base when you get 3 Card points as this allows you to buy your Lords Key as soon as possible. Do note that you want to try and shove your lane anytime before you base as by the time you return, it should be in a position where it hasn’t crashed into your turret yet.
Upon purchasing the Lord’s key, we’re going to assume that it’s past or at least very close to 3 minutes in game, so make your way to the harvester in the jungle and activate it (granted your jungler hasn’t done it himself, which he should if he started Red Camp). If your ward is still there from level one, it should be due to expire soon so replace it before making your way back to lane to finish laning phase.
Once you’re level 5 you should be looking across the map for potential ults. This does leave your laner alone, but granted that they understand they’re laning with a Muriel, they should play accordingly. This can be hard to communicate in the absence of VoIP but with practice and better game knowledge the ults should generally become more and more successful.
Mid game
I want to say that Mid game starts when the first set of outer turrets have been destroyed. This opens up new focuses and promotes roaming as there’s more access to the map. I feel that one focus that should be prioritised is the black buff. This spawns at 6 minutes and it allows you to siege very well with your Ranger as they can persistently hit the tower when minions are present (unlike melees who are susceptible to harass).
Your focus is to make sure that there’s vision around where potential fights can occur, make sure that harvesters are being collected and to make sure your Mana isn’t too low in case a fight occurs. Some priorities are still present from Early game like last hitting and trading, but these are much more accelerated now as it’s usually better to try and shove the wave rather than maintain it there.
By this time you should be pretty close to your core build and looking for fights/picks to capitalise. Depending on how far ahead you are depends on the positions you want your wards. If you’re behind, you want to ward your jungle entrances so you don’t get flanked by the enemy.
Late game
Going on the same basis of Mid game, it occurs when the second layer of turrets have been destroyed and there’s over 40 card points spent. Warding is now more important and thus more dangerous as if you’re caught, the death timers are so long that the enemy team can generally gain momentum of the map. Your ultimate has a different function here, as it should be used as either a follow up to an engage, or a disengage/peel.
This is because you’re generally grouped as five for objectives such as the Prime Orb, unless your team has someone split pushing. I’m not saying that you shouldn’t ever use ult on the person splitpushing, but if you leave your team to secure the kill or objective with them, it leaves the rest of your team in a 3 v 4 situation.
The focuses here are to still maintain the harvesters but as a team, your focus should be trying to secure an Inhibitor. This allows you to start summoning super minions and create immense pressure on that lane.
Jungle?
So with how the game is currently, I’ve been opting to duo jungle with Muriel. The idea is that the Ranger goes solo meaning you can apply substantially more pressure as two Junglers, than as you would as been a duo lane. This can exist by the fact CXP is shared on a 1:1 ratio meaning you earn as much if not more CXP than solo laners (assuming that they miss some last hits).
Why take Muriel Jungle?
Well let’s reinstate what Muriel’s role is: she is a utility support with shields, movement speed boosts, minor CC and a global ranged ultimate. What better, than to be able to support any member of the team when needed. Her ganks are strong with her 4 second, 30% move speed slow. She doesn’t need to deal all the damage as there’s two junglers and the laner themself.
Her clears are decent as she keeps both her and the other jungler healthy with shields. The fact she makes existing jungle threats such as Grux and Feng Mao more threatening with her Move Speed buff should be more than enough reasoning to place her jungle with an existing one.
Let’s not forget, there’s the global pressure with her ult meaning that at any time your laner needs help, you’re not punished as you would be as a duo lane since you’re not leaving someone behind. I think the idea that you can apply a kit like Muriel’s anywhere on the map is really powerful. She can compensate for your teams mistakes and punish the enemies for theirs.
How to do it?
Similar to Lane Muriel, you will start E as this will keep you healthy throughout the camps. You want to start either Blue or Red buff (I’ve been opting to Blue as Red is often invaded and Blue is better for Muriel) and take the Blue buff if you start it (give the red to the other jungler it’s pretty trash on you).
Depending on how many people shared the XP from the camp determines what level you are after doing a White camp. If it is just you and your Jungle Buddy, then you will achieve level 2 from one White camp and can look to pressure the map with ganks. If a laner joined you for the CXP then you will need to do the other White camp on that side of the map.
Once you hit level 2, you want to take Q as this will help you most in ganks. From here, it depends on what your map is reading. Is their jungler ganking on the opposite side of the map? Invade their jungle as it should be empty. Is Mid lane shoved? Then feel free to punish them for it. Is your Mid lane shoved? Ward and stay near for a counter-gank.
From here you just want to follow your Jungle Buddy around since it makes clearing the camps easier and ganking more guaranteed. You can split later though as the White Camps do not scale meaning you can clear them yourself. If you do split, it doubles the pressure from you both being on the map, especially since you can for example, gank Right lane with your laner and then help your Jungle buddy on Left lane with ult. Do note that separating means that being caught out is more punishing as you will not be able to 1 v 1 the enemy, your only option is to flee.
Synergy
Ranger Synergy
As of now there are three Rangers, these are Murdock, Twinblast and Sparrow. They all have something unique to offer and also work well with Muriel’s kit.
Murdock
I feel that Murdock has the best synergy with Muriel at this current space and time. His Q is short range AoE which can be helped with Muriel’s RMB. This is also an Energy Armor shred thus increasing Muriel’s damage too which in early trades isn’t too bad. If a trap is triggered this allows for easy follow up on Muriel as she can W the area and land and easy Q to chain the slow it provides. This is especially helpful when pushed to their turret as the Murdock will be placing his traps beneath them forcing them to potentially miss some last hits. This applies a lot of pressure and can be done so with the fact Muriel makes up for his lack of mobility. His RMB also makes up for something Muriel lacks. If a Steel or Rampage jump into them both, Muriel alone can’t deal with it but Murdock can knock them back which can be then chained with a trap and Muriel slow. Overall I feel they aid each other’s weaknesses and boost their strength.
Sparrow
The way I feel about Sparrow is that her best support is Muriel, but she isn’t Muriel’s best ranger. She’s in the same boat as Murdock in that she lacks mobility but she also lacks CC. I can’t speak much for this as I haven’t played with many Sparrows at all. Muriel’s slow does allow her maintain her damage output and the shields and speed boosts can make up for if she mispositions. But why take Sparrow over lets say, Twinblast. For the ultimate? Twinblast’s pierce’s targets meaning he can hit whoever he pleases. Her laning isn’t anything to shout about. The fact she’s so reliant on positioning and getting to late game, why take Sparrow when other options exist?
Twinblast
Twinblast can function well with her as it allows him to be more oppressive. If he’s dashing aggressively then Muriel can sustain him with the Shields. One problem with Twinblast is that during his ultimate he’s slower than general combat speed. What Muriel does is for the duration of the RMB, it allows him to be more mobile whilst in ult.
Jungle Synergy
Grux
My favourite Jungle buddy at this current time. If his clear wasn’t already fast, it’s now faster and healthier from the get go. Your RMB allows him to stay on his target and cleave them. It also allows him to build more damage if he can trust that you’ll keep him alive meaning no squishy on the enemy team will last long.
Feng Mao
The application of Grux exist on Feng Mao too. You help him stick on his target and live longer whilst doing so. Do note that your Passive works with his shield, so in combat he will essentially always have +14 Health regen which is a lot come to think about it.
With Kallari’s stealth, it allows for Muriel to get an Invisible engage with her ultimate as long as you can communicate it well. This makes Kallari into an engage threat where she’s normally a backline threat.
Team Synergy
Steel
I feel Steel has one of the best synergies with Muriel. Their ultimate’s combined is devastating and if Muriel is out of vision, very unpredictable. There’s also the fact that Muriel’s passive works with his Shield (E) meaning that there’s some sustainability from the pair of them.
Muriel’s speed up allows for Gideon to get in place for a nice combo. Gideon Q and Ult with Muriel E and Ultimate. Locking them inplace and keeping your team alive at the same time.