This guide may be out of date. The guide author did not update it for more than 6 month.
For the most up-to-date information please refer to the Muriel Build Guide
- Introduction
- Credentials
- Summary (TL;DR)
- Quick Full Build
- Deck Build
- Deck Build Explained
- Abilities Overview
- Abilities Upgrade Priority
- Ability Combos
- What is my job when playing Support?
- Early Game
- Mid Game
- Late Game
- Warding
- Harvesters
- Buffs
- Synergy
- How Good is Muriel?
- Initiation
- Ganking
- FAQ
- Shameless Plug
Introduction
Hello, and thanks for checking out my Muriel guide! This will be an extremely in-depth and advanced guide for those looking to better their Muriel and support play in Paragon. This is an extremely long and in-depth guide, but I tried to organize it as well as possible to help you navigate through this wall of text. This is the first guide I have ever made so please feel free to make recommendations or requests on how I can improve this guide for you. I will be happy to add and edit if the feedback is good. Thanks again, and enjoy the guide!

I also tried to put my main points in blue text for the TL;DR version of this guide.
Credentials
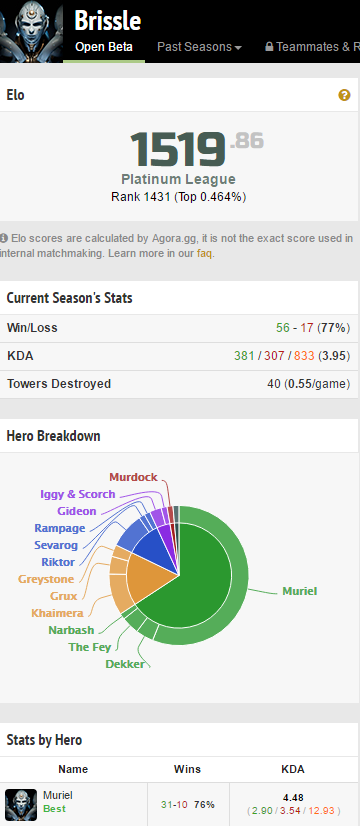
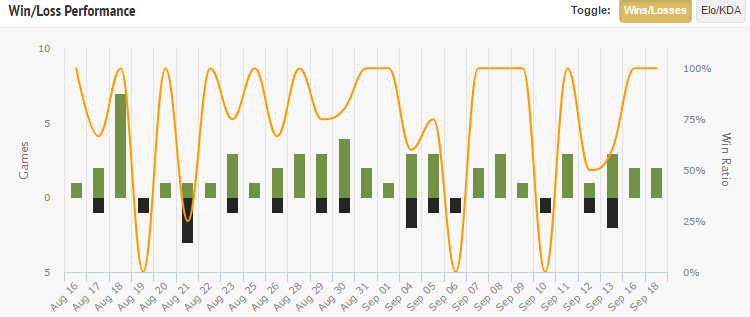
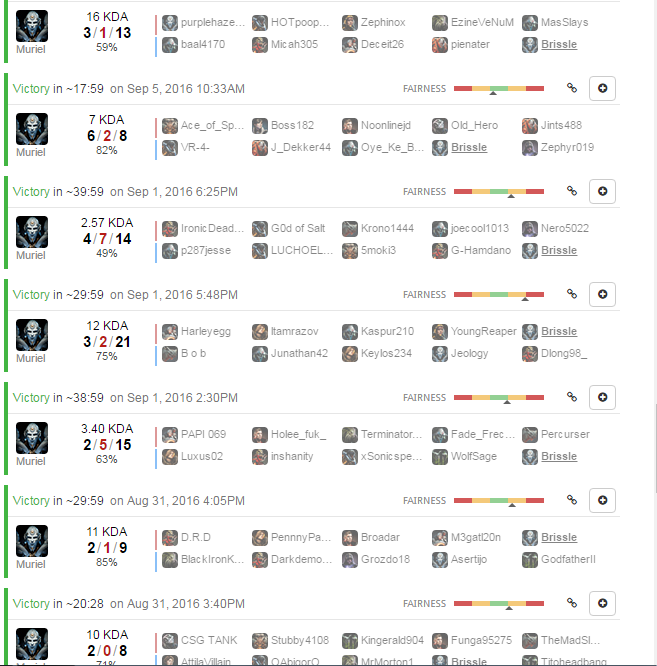
I am Brissle, and I am currently maining Muriel in Paragon at about a 75%+ win rate. I have reached Challenger Muriel and am working through the Master tier. I played League of Legends for about 3 years at around Gold ELO, maining support with a little jungle along the way. I am playing Paragon with a Platinum ELO at the top <0.5% of all Paragon players. I am currently ranked 1431 out of 308,000+ players, and have 56% of my games played as Muriel.


Summary (TL;DR)
Key points: Lane with a ranger and let your teammate last hit while you harass. Ward for your lane and in your jungle. Take harvesters at 3 minutes, 6 minutes, and 9 minutes. Have most global cxp on team. Stay active. Use communication pings. Build mana, cdr, health, and situational damage, armor, and energy armor.
Strengths: The most active Hero in the game. Has the biggest map-wide presence. Can keep team deaths ridiculously low, sometimes in the single digits. High skill cap.
Weaknesses: Weak until level 3, though can pull off a level 1 gimp in the right hands. Low damage. Not very tanky until mid/late game.
Quick Full Build
Lord's Ward  Chrono
Advanced Mana
 Greater Health
Pendulum of Lords Advanced Mana
 Mana
Mana Basic Mana
Lantern of Spring Advanced Chrono
Advanced Chrono
Advanced Chrono
Honor the Pure Advanced Mana
Greater HealthGreater Health
Tempered Plate  Beta GuardBeta GuardBeta Guard
Tuned Barrier  Greater BarrierGreater BarrierGreater Barrier
Deck Build
Start:
Health Potion, Mana Potion, Harvester's Key
First Back: 3 minutes, back while capturing lane side harvester
Second Back: 6-8 minutes, after you've captured 6 min. harvester and collected 6 card points
Advanced Mana or
Advanced Chrono
Third Back: captured the orb prime harvester at 9 minutes, 6 card points, consider selling Harvester's Key, complete Pendulum of Lords, pick up your next item
ManaBasic Mana or Chrono Basic Chrono
Honor the Pure? Lantern of Spring? Tempered Plate? Tuned Barrier?
This completes your early game core. The rest of the build is situational and should be changed based on team composition and how the game is progressing.
Good Source of CDR
Lantern of Spring Advanced Chrono
Advanced Chrono
Advanced Chrono
More utility:
Honor the Pure Greater HealthAdvanced Mana then
Greater Health or Advanced Mana
Circlet of Health Advanced Mana
Advanced Mana
Advanced Mana
Tempus Pearl Beta Barrier
Beta Barrier
Beta Barrier
Celestine Diamond Advanced Mana
Advanced Mana
Advanced Mana
More defensive/enemy team is fed:
Elysian Diamond Greater HealthGreater HealthGreater Health
Tempered Plate  Greater GuardGreater GuardGreater Guard or Greater Guard
 Guard
Guard Minor Guard
Tuned Barrier Greater BarrierGreater BarrierGreater Barrier or Greater Barrier Barrier
 Minor Barrier
Team is lacking energy damage
Chrono-Mancer Disc Major CastMajor CastMajor Cast or Major Cast
 Cast
Cast Minor Cast or
Advanced Chrono
Advanced Chrono
Advanced Chrono
Wellspring Staff Major CastMajor CastMajor Cast or Major CastCastMinor Cast
Staff of Adamant Major CastMajor CastMajor Cast or Major CastCastMinor Cast
Deck Build Explained
Starting Items:
- Starting health potion/mana potion/harvester's key is pretty standard in the current Paragon meta. With the way unlocking harvesters is set up, not everyone on your team will technically need a key, and many will claim that it is the Jungler's responsibility to unlock harvesters as he will be the one closest to those areas most of the time. However, I firmly believe that the support should take on a lot of the harvester capturing, especially if you know how to do it correctly. Many games as Muriel you will cap all 5 harvesters (two 3 minute harvesters, two 6 minute harvesters, and the orb prime harvester at 9 minutes) since you have a global ultimate and are heavily present in all areas of the map. For this reason I think a harvester's key is necessary, and the health and mana pots are good for sustain throughout the entire early and mid game. You can always sell all 3 items whenever you feel it is necessary for a full 3 point card at any point in the game, making their value extremely high.
- An alternate start would be to take your Lord's Ward right away. This is certainly a more safe start to avoid getting ganked early. However, you do not have the health and mana potions to be aggressive early and will be entirely reliant on your teammates to unlock all harvesters until you get a key. I do not recommend scout's ward as it currently provides so much less value than the Lord's Ward. Let's take a look:
Scout's Ward 1 Card Point, 1 Vision Ward lasting 3 minutes, charges refresh at base
Lord's Ward 3 Card Points, 75 mana, 100 health, 2.5 CDR, 2 Shadow Wards lasting 3 minutes, charges refresh at base
- For just two extra points, the value that you get out of the Lord's Ward is a no-brainer, and as a support it is simply a must have. You get a full 3 card points worth of stats, along with an additional ward for just 2 card points more than the one point you would spend on a Scout's Ward. For this reason, I believe all Heroes in the game should consider picking up a 3 point ward card in every game, as each player that does so increases the team's vision drastically.
Core:
- The core of your build should consist of your Lord's Ward and your Pendulum of Lords. I build Lord's Ward and then immediately go into my Pendulum of Lords as maxing out Lord's Ward does not give you any fully upgraded bonuses. I slot the Pendulum of Lords with 3/2/1 mana upgrades to get a good mana pool going and rush an early fully upgraded bonus, giving you an additional 2.5% CDR. CDR is useless unless you have the mana to dish out full spell rotations quite a few times before heading back to base, so we want to establish a good bit of mana before dedicating to cooldown reduction right away. If played correctly, you should always have 6 card points on your second back, which should allow you to grab your Pendulum of Lords and an advanced mana to get you going. With your next 6 card points you can max out your Pendulum of Lords with 2/1 mana upgrades and start looking into your mid game build with more utility/CDR if your team is doing well or defensive stats if you are behind/getting focused. Keep in mind that working your way up to 40% cooldown reduction is ideal for support so you can ult around the map every time a fight breaks out and get off more spell rotations during team fights.
A Good Source of CDR:
- Lantern of Spring
- A great source of CDR with a little physical armor to help Muriel's sustain. Good item to pick up when you need that little bit of armor but don't want to devote yourself to a Tempered Plate just yet. This is also a good opportunity to start stacking up your CDR with 3 point chrono upgrades. My most likely choice for my 3rd item if I don't go with Honor the Pure.
Mid Game:
- Utility
- Honor the Pure
- This is a really fun card that I highly recommend you include in your Muriel deck if you have it. Grants you another 100 health and 75 mana, but the active is where it really shines. Shield yourself and nearby allies for 5 seconds, absorbing up to 50 + (10x level) damage (120 second cooldown). Slightly long cooldown but this active can really swing a team fight by adding a fourth shield to your utility. Combine all of your shields with this active and you might find your team winning a clean 5-for-nothing team fight while still being healthy enough to push towers or take the orb prime. I highly recommend picking up this card 3rd if your team is doing well and you have the card points to spend on it.
- The only downside to this card is the extra card point it requires (4 card points total), however remember that we don't need our harvester's key all game, just until the orb prime harvester has been capped at 9 minutes. At this point in the game you can sell your key giving you the extra card point you need to spend 4 points on Honor the Pure. You will be pretty squishy at this point with no added resistances and only a little added max health, so I would definitely recommend building some defense moving into the late game while also going for that 40% CDR cap.
- Circlet of Health
- This is another fun card that most players have unlocked and can include in their deck. Gives a bit of mana at 75 but grants a passive +4.2 health regeneration to all nearby allies at any given time. This card is great for long pushes, drawn out team fights, and any comp focused around group fighting and pushing. It also has some nice synergy with Narbash, creating an unparalleled level of sustain for your team. Not quite as much of an instant game changer as the shield from Honor the Pure, but allows for a more sustained level of utility instead of once every 120 seconds. Going for one huge team fight every two minutes? Honor the Pure. Looking to push and sustain back and forth trades? Circlet of Health.
- Tempus Pearl
- Really cool card that I sadly have not obtained yet. A little health and mana are always welcome, but what an incredible Active on this card! Lots of movement speed for all your allies to initiate, chase enemies down, or disengage from a team fight. I will definitely include this card in my deck whenever I unlock it.
- Celestine Diamond
- A good sustain card with a bit of damage. Take Celestine diamond when you are looking for a little damage mixed with the mana to cast abilities. This is a safe, utility card choice. The utility counterpart to Elysian Diamond.
- Honor the Pure
- Defense
- Elysian Diamond
- Great mixed bag defensive item that when fully upgraded provides Muriel with 800-1100 max health (a stat she loves so much) along with a little energy damage and mana regeneration. The defensive counterpart to Celestine Diamond.
- Tuned Barrier
- Your go-to energy armor card. 22 energy armor, 100 health, and an additional 242 energy armor when fully upgraded with 3 Greater Barrier. Pick up this card sooner rather than later any time the enemy team has 4 or more energy damage dealers or has any energy damage dealers that are extremely fed. Great card for surviving Gideon ultimates and those long ranged Murdock ults. Same as Tempered Plate, I usually go for the 3/3/3 Greater Barrier route, but if you need immediate energy armor 3/2/1 is a better option. I will get this card at some point in 50-75% of my games.
- Tempered Plate
- Your go-to physical armor card. 22 armor, 100 health, and an additional 242 physical armor when fully upgraded. Pick up this card sooner rather than later any time the enemy team has 4 or more physical damage dealers or has any physical damage dealers that are extremely fed. Your survivability will increase drastically and will allow you to stay in the fight longer to support your teammates. I usually slot this card with three, 3 point Beta Guard to get the maximum amount of defense out of the one card. However, if you are rushing some emergency defense I would go with a 3/2/1 guard route instead. I will usually get this card at some point during every game.
- Elysian Diamond
- Damage: Disclaimer - I do not very often build any damage on Muriel. She has a bit of burst combo, but her damage scaling is not very good. I will only build damage if I am extremely fed, our team needs the energy damage in its comp (in which case, you probably should have played Dekker, The Fey, or Lt. Bellica in the first place), or my team is utterly useless and I have to carry. Otherwise, you're better putting these points into defensive stats or more utility.
- Chrono-Mancer Disc
- A good mixed bag item with some energy damage, mana, and fully upgraded 5% CDR. Not a bad choice if you're looking for a mid/late game filler item. Can be a good third item in a more aggressive/offensive Muriel build.
- Wellspring Staff
- Some damage and mana. More damage than Chrono-Mancer Disc. The most utility choice for a damage item.
- Staff of Adamant
- Some damage and health. More damage than Chrono-Mancer Disc. The most defensive choice for a damage item.
- Chrono-Mancer Disc
These cards will pretty much round out your deck. If you have extra card points, you can use them to include multiple upgrade options as every game involves different scenarios where different upgrades are applicable. I also include Epic's new card, Empyrean Mask, though I have only used it a few times and am still toying around with its efficiency. So far it seems like a fun card, but maybe not the most optimal until 4th or 5th card purchased.
Abilities Overview
Orb Left Click
Ranged auto attack.
Energy damage: 35
Energy damage scaling: 0.4
Cooldown: 1.5 seconds
Damage increase per level: 3
Auto attack that deals 35 damage. Sufficient poke in the early game, but only when there are few enemy minions as you will draw minion aggro when trading. Mid to late game this is used for a bit of extra damage and to keep enemies out of travel mode. Not much, but worth spamming as much as possible while abilities are on cooldown.
Serenity Q
Skillshot that passes through minions, damages, and applies a slow.
Movement speed slow: 100/130/160/190
Slow duration: 4 seconds
Energy damage: 75/105/135/165
Energy damage scaling: 0.75
Mana Cost: 52/56/60/64
Cooldown: 15 seconds
Take this ability first as it is great for early game damage, harass, and scoring first blood. The ability will pass through minions, making it a great source of unexpected damage for enemies trying to minion block. If you catch an enemy out of position at level 1 you can hit them with an auto attack -> Q -> auto attack combo for a lot of burst damage and a slow. If your ranger lays down some autos you can easily force a health potion, base, and even a first blood. Do note that committing all the way to the enemy tower at level 1 is risky, as you are vulnerable to minion damage and an early gank which can cause you to give up first blood to the enemy jungler. Be smart and assess risk vs. reward.
Although this is a great ability, I tend to leave one point in it until all my other abilities are maxed out. The increased slow and damage is nice, but Muriel's other abilities offer more utility. The only time I will put an extra point into Serenity is when I level up in the middle of chasing an enemy for a kill, in which case the damage and slow increase will help secure the kill, making it more valuable in the moment.
Large AOE bubble that applies a shield to any allies inside and damages enemies when the bubble pops.
Shield: 100/175/250/325
Shield duration: 5 seconds
Energy damage: 60/90/120/150
Energy damage scaling: 0.25
Mana cost: 56/60.5/65/69.5
Cooldown: 16/15/14/13
Cast range: 1750 (very far)
Muriel's bread and butter ability. You will max this first every game as you will get the most value out of it. Good damage, huge aoe shield for your team, and very easy to land. It is worth noting that even if you don't lay the bubble directly on top of yourself or an ally, you can still walk into it to obtain the shield. This means you can lay the bubble in front of a retreating enemy and run into it just before it pops, getting the damage and the shield benefits. This ability has great synergy with your Q, which can slow enemies inside the bubble, making it hard for them to escape before it pops. Note that you should be alternating Muriel's shields as they fall off to maximize blocked damage, so make sure you are weaving in shields as they get damaged down instead of using all of your abilities immediately as soon as a fight breaks out.
Alacrity RMB
Skillshot orb that shoots in a straight line and lands on any terrain it touches. If an ally makes contact with the orb they gain a shield and a burst of movement speed.
Pick-up duration: 8 seconds
Shield: 60/110/160/210
Move speed increase: 110/150/190/230
Move speed duration: 2 seconds
Mana cost: 52/56/60/64
Cooldown: 15 seconds
Cast range: fairly unlimited within line of sight
So much utility here. A nice size shield and a huge movement speed burst that can be applied to either an ally or Muriel herself. While Alacrity has obvious uses such as chasing fleeing enemies or escaping attacking ones, it can also be used to escape ultimate traps such as Gideon's Black Hole and Gadget's Tesla Dome. Simply aim the orb at your feet directly in front of you and run for the hills. We max this second after Consecrated Ground for its utility, ability to dictate movement, increased shields in team fights and skirmishes, and the increase your ability to disengage. Take your time aiming this ability. It is easy to miss and your teammates likely won't notice the orb laying on the ground unless it is directly in front of them, causing you to waste mana and put your ability on cooldown.
Fly to a targeted ally anywhere on the map. When activated, grants the ally a shield immediately. All allies in the area of the AOE receive a shield upon arrival, while all enemies in the area of the AOE are knocked up.
Shield: 350/600/850
Shield duration: 4 seconds
Mana cost: 100
Cooldown: 130/120/110
Muriel's ultimate is what gives this Hero her identity and makes her so unique. After getting a decent amount of CDR, you will find your ultimate available for use pretty much every time a teammate is low on health. During the mid-late game, no one on your team should be dying unless you ulted to them and could not save them. This ability takes a bit of time to master, as it requires you to pay extreme attention to the map and your teammates at all times. If you see a notification that one of your teammates has died and your ultimate was ready, you done messed up m8.
When flying in to a team fight, deciding who to use the ultimate on can be tricky. Obviously if anyone is near death, that teammate will be your first choice. However, if your team can stay alive until you get there, you may want to use the ultimate on a backline fighter like Grux or Khaimera. This can land you right in the core of the fight where you can get the most out of the knock up portion of the ultimate, giving you a more aggressive entrance to the fight. You still have lots of shields to dish out to any rangers or casters in your backline when they get low, but only rely on this if they are not in too much danger at the start of your ultimate. You never want to ult in on a healthy teammate only to watch your ranger die as soon as you arrive.
One of the hardest parts about using this ultimate is deciding if you want to try to help an out of position teammate escape. Most times, unless the number of enemies is more than 2 greater than the number of teammates (i.e. 4 enemies 1 teammate) I will go for it. Many times with your shields and slow you can save a teammate from a 3-1 deficit and both of you can escape with your lives. However, it is certainly a frustrating feeling when this attempt backfires and you only add another corpse to the insanely long death timers currently in this game. Be smart and act quickly. If you don't have the confidence to go for it, save your ult for a better time and keeping doing whatever you were doing, taking advantage of the lack of enemies on your side of the map.
As always, with any ultimate in any MOBA, prioritize putting points into this ability.
Abilities upgrade priority
R > E >RMB > Q
1 2 3 4 5 6 7 8 9 10 11 12 13 14 15 

✔ ✔ ✔ ✔ 

✔ ✔ ✔ ✔ 

✔ ✔ ✔ 

✔ ✔ ✔ ✔
Ability Combos
Level 1 First Blood Combo
- Help your ranger push and last hit the first wave of minions. When there is only one or two enemy minions remaining, enter travel mode and run up close to the enemy.
- Auto Attack → Q → Auto Attack
- If your ranger hits two or three autos with you spamming yours, this can often secure first blood. Note that this is a very aggressive and risky start to the game. Having a Jungler close by to counter gank is recommended.
Harass Combo
- Auto Attack → E (on top of you and enemy) → Auto Attack → Q → Auto Attack
- Good chunk of burst damage that should have you coming out on top of the trade if shielded and done properly
Waveclear Combo
- E → Q → Auto Attacks
- Remember that your Q goes through minions, so line it up to fire straight down the marching line for maximum efficiency. I use this combo when minions are low on health to guarantee some easy last hit bursts. This combo will never outright clear a wave.
All In Combo
- Travel Mode to melee range → Auto Attack → E → Auto Attack → Q → RMB your ranger/ally → Auto Attack → Ult closest ally to target
- Your harass combo paired with your other utility abilities. This will do burst damage, slow the enemy, shield and speed up your ranger so he can hit his autos comfortably, and ends with a large shield and hopefully a knock up. Great, safe way to secure a kill.
Escape Combo
- E right on top of yourself so you get the shield and likely hit the chasing enemy with some damage → turn around and Q enemy → turn back around and RMB right in front of you for another shield and speed boost
- If done properly, this combo will allow you to escape any number of enemies unless you get CC'd, in which case you're probably dead unless you ult away. You should absolutely ult away to stay alive at any point in the game if at all possible.
What is my job when playing Support?
- Ward:
- This is the primary role associated with support play in any MOBA. Warding is essential to vision and knowledge of where the enemy team is so you can push lanes. Generally you want to place wards on the invisibility pads and at choke points. During late game, you always want to have a ward on Orb Prime. It is good to place your wards somewhere hard to find where they can't be easily destroyed. If you ever see an enemy ward it is your job to stop and destroy it, as you have a ranged auto attack and can catch up with your team to join a fight or push a lane after the ward is destroyed. Always lay down both wards before going back to base, even if it is not an optimal spot, as your wards refresh every time you base.
- Communicate:
- This goes for every role in MOBAs, but as a support I try to be the most prominent shot caller on the team. In Paragon, this primarily involves the use of the communication ping wheel. Letting your team know enemies are missing, which lanes need defending, when a buff or lane needs attacked, and when to make the call to go for Orb Prime can completely turn the tide of a game. The ping wheel can be brought up by hitting "C" and options can be clicked through after that. It is a bit awkward at first, but try using this wheel while backing, waiting for minions, or waiting to respawn. After awhile it will become second nature and you will be able to fly through them without a second thought. Learning the ping wheel is an absolute must if you want to reach your maximum potential in Paragon.
- Help create team comp:
- Generally when making a team composition you want one of each role: Tank, Caster, Fighter (Jungle), Ranger, and Support. If you see your teammates have pre-picked a Khaimera and a Grux, you should ask one of them to switch to the role that is needed. Neither of these two Heroes are good laners and in the current Paragon meta you don't want two Junglers. Sometimes neither of them will switch and your team comp will suffer, but I find that most of the time when I ask them to switch they will at least switch to a laner that they know how to play. Creating a good team comp takes a bit of game knowledge which comes with time, but overall communication in the pregame lobby is a healthy way to head into the start of the game.
- Unlock harvesters:
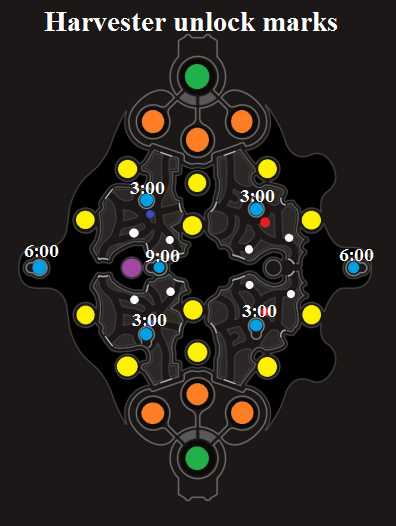
- Harvesters are an essential part of the Paragon meta. I make it my personal goal to unlock minimum 3 harvesters every game. Many games I will unlock all 5 harvesters for my team. To do this, you must have good knowledge of where the harvesters are and when they spawn. At 3 minutes you should back on your inside harvester closest to your lane and spend your first 3 card points. At 6 minutes, you should contest the outside harvester closest to your lane. At 9 minutes, you should be standing on the orb prime harvester as it unlocks. If done correctly, 90% of games you will take these 3 harvesters without any contest from the enemy team. This allows for a smooth cap and you can immediately start to reap the rewards of the harvesters as they generate cxp. I will always hold onto my key until all 5 harvesters are capped. Since you are so mobile as Muriel, sometimes you can ult to the far lane at 10-11 minutes and the harvester will still not be capped. This is an easy cap for you and should always been done immediately, as you are lucky to be capping it this late in the game anyway. Usually the jungler or opposite laner will get the other 3 minute harvester, but sometimes if you want something done right, you gotta do it yourself. As a general rule of thumb in Paragon, always return to base while standing on a harvester if at all possible. Try to track which harvesters haven't been collected in awhile for maximum cxp.
- Have most global cxp in game:
- This feeds off of the previous point, but as the support you should always have the most global cxp on your team. This means that any time you are not pushing a lane, team fighting, or warding you should be collecting harvesters. You will miss out on some xp in return for cxp for your entire team. Travel mode makes it very easy to move quickly around the map and you have your ultimate in case a fight breaks out without you. This leaves you free to soak up those harvesters any time they are starting to get full. Your team will love you for this. A good goal for global cxp is 1k per 10 minutes.
- Stay active and with team:
- Any time you're not warding or collecting harvesters you will want to be where the action is. You are the support, and one cannot support without teammates around. Your goal is to be in every team fight possible. Your kill participation will fluctuate based on match length and how active the early game stage is, but a good goal for kill participation is 60%. Harass, initiate, communicate when to attack or retreat, and keep your team shielded as much as possible.
- Chat/help team with builds:
- Communication goes further than just the ping wheel. Type whenever dead or backing to give your team insight on the match. For example, if you see an enemy Gideon is 5/0/1, you may want to instruct your team to build a Tuned Barrier at the next opportunity. Most of the time they will adhere.
- Get ranger fed:
- This is without a doubt your number one goal of the early game stage. If the kill is ever secured (meaning there is no way the enemy will live) you want to give the kill to your Ranger. This is general MOBA etiquette. You are the support, your Ranger is the carry. If you don't like it, play a Ranger. Your job is to be as selfless as possible to put the entire team in a position to be successful. Lane with your Ranger as much as possible until the first tower is taken, and try to peel for him in team fights. Prioritize supporting your Ranger over any of your other teammates. Rangers are generally the least tanky and do the most damage out of your entire team.
- Don't die:
- Obviously a goal of any role, but the support even more so. You should aim for 5 or less deaths in a complete game as Muriel. You have so many escape options and are probably top 5 safest Heros in the game. If you get in trouble, you can just ult completely out of the fight for a get out of jail free card. Every time you die the enemy team gets stronger, which is the opposite of your goal as a support player.
- Body-block for critically wounded allies:
- Body blocking is an incredibly useful tool for saving low health allies trying to escape combat or burst down an enemy for a close kill. Position yourself directly in front of an ally to soak up auto attacks that would otherwise kill them or keep them out of travel mode. In the mid to late game Muriel is tanky enough to absorb these autos with very little impact since she has shields and a good health pool. Toss in a RMB orb right on your ally for a shield and speed bost and they will be healing up at base in no time.
- Below is a a clip of an insane Diamond level Muriel play that demonstrates the importance of wall hugging and body blocking, especially in the jungle.
- Body blocking is an incredibly useful tool for saving low health allies trying to escape combat or burst down an enemy for a close kill. Position yourself directly in front of an ally to soak up auto attacks that would otherwise kill them or keep them out of travel mode. In the mid to late game Muriel is tanky enough to absorb these autos with very little impact since she has shields and a good health pool. Toss in a RMB orb right on your ally for a shield and speed bost and they will be healing up at base in no time.
Early Game
The early game phase should consist of farming in lane with your Ranger, usually in left lane. Let your Ranger last hit, although if they are struggling to get last hits you can help out. Any time he backs you should be last hitting yourself. Don't push the lane. You want to only go for last hits and let the wave push to your tower where you're safe and the enemy is exposed to ganks. Lane control is a huge part of MOBA's. At 3 minutes you should have your first 3 card points as long as you and your Ranger have successfully last hit at least 50% of the minions. Immediately run over to the inside harvester and back while you unlock it. Buy your Lord's Ward and sprint back to lane. Continue farming/harassing until 6 minutes when you should immediately contest the outside harvester. Back when you have 6 more points and pick up your Pendulum of Lords and Advanced Mana. You now have your ultimate and can start making plays around the map, warding, and placing/collecting harvesters. Early game phase ends when the first tower is taken.
Mid Game
During the mid game you want to make as much of an impact as possible. Team fight, ward, communicate, and collect harvesters. You want to start organizing pushes for towers at this point in the game. Provoke team fights as Muriel excels in these situations. Protect your ranger as much as possible and continue farming/getting him fed.
Late Game
In the late game you can do one of two things: stay with the team and help them group push a lane, or split push with your ultimate ready. Split pushing can draw attention to your lane which will attract enemies to come stop you. After they come, you can run away or ult to your team and push the lane advantage hard. You really shouldn't be dying in late game as you should have as much armor, energy armor, and health as you could ever ask for and your ult is on about a 50 second cooldown. Use ult as you please because it will be up by the time the next fight breaks out. Always keep Orb Prime warded so the enemy can't sneak it. Try to secure Blue Buff for yourself as much as possible to give yourself an additional 20% CDR and some mana regeneration.
Warding
Placing wards is an essential part of playing the Support role in any MOBA (although it is a common misunderstanding that Supports are the only ones who should be laying wards - this is not true). However, wards are useless if they are not placed in spots where they will spot enemies.
- Most Useful Ward Spots
- Right on the inside of your lane in the jungle
- Warding this area will warn you and your allies of incoming ganks so you are not caught out of position. This is the most common and important ward spot in the game.
- Enemy Buffs/Friendly Buffs
- Buffs are very strong in Paragon. For this reason, buff control is important. You want to make sure your buffs are secure while your enemies' buffs are being contested. You can often spot an enemy taking their red or blue buff with low health, making them an easy target for a kill, free buff, and a lot of xp.
- Jungle intersections
- Any place in the jungle that intersects is going to be a great spot for a ward since you are covering two different jungle routes, so there is likely to be high traffic. As a rule of thumb, anywhere with an invisibility pad will always be a great place for a ward to avoid "face-checking" by blindly running onto the shadow pad.
- Orb Prime
- This is the most important ward spot in the late game phase. If you are nearby and notice Orb Prime is not warded, go ward it. Keeping vision over Prime is essential in the late game when teams can 2 man this buff or blow it up as a group of 5 (especially after Prime saw a colossal nerf to his health recently). Since capping the Prime buff can end the game in the blink of an eye, it is absolutely necessary to keep an eye on this part of the map any time after level 12.
- Right on the inside of your lane in the jungle
- Miscellaneous Ward Tips:
- Place your wards in discrete or hard to reach places
- Placing your wards carefully can allow them to last much longer than just throwing them on the ground in front of you. When in lane, I like to place my wards either on top of the rocks on the other side of the entrance to the lane or on the wall right above the invisibility pad. This will ensure maximum value out of your ward placement.
- Always destroy enemy wards
- As Support, part of your job is ward control. If you stumble upon an enemy ward, especially one that is well placed, it is worth your time to stop and destroy it. This will allow your teammates to sneak around the map more freely, possibly securing themselves a kill and you an assist. Always destroy enemy wards in your lane before asking for a gank. If your Jungler comes to gank a warded lane he will most likely be wasting valuable time that could have been better spent farming or ganking other lanes.
- Never base with wards available
- Your wards replenish every time you go back to base, giving you a fresh 2 wards to lay down. For this reason, you are "wasting" a ward if you still have it in your inventory when you back. If you are too low or in too much of a hurry to go place a ward in a good spot, just lay it down at your feet as you back. It is better to have a ward in a bad spot than no ward at all!
- Place your wards in discrete or hard to reach places
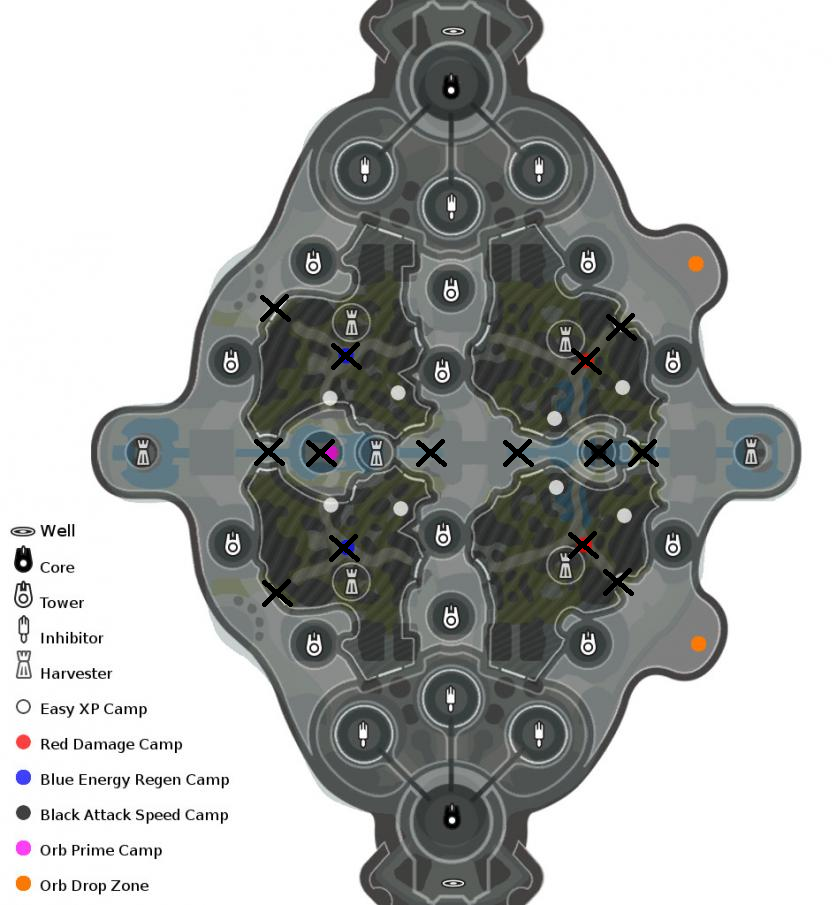
Harvesters
Knowing the unlock times for Harvesters is a must for Support players. At 3 minutes and 6 minutes you should be standing/backing on your lane side harvesters to ensure a cap and get them filling with cxp as soon as possible. At 9 minutes the Orb Prime harvester becomes available. Assuming you won't be capping the enemy team's 3 minute harvesters, the best case scenario is having 5 harvesters unlocked for your team.
Miscellaneous Harvester Tips:
- Go back to base on harvesters
- If you need to back and can make it to a harvester first, do it. You can use your time spent backing efficiently by collecting cxp while doing so. You can press "b" as soon as you step onto the harvester since collecting a full harvester worth of cxp takes the same amount of time as it does to back.
- Keep track of all 5 harvesters that you have access to
- Constantly be looking at your mini map to see which harvesters have been collected by your teammates recently to avoid making the trip to one that has already been capped. Also keep an eye on locked harvesters to track which ones you can go unlock. This is important to making the decision on how long you should hold on to your Harvester's Key.
- Prioritize the orb prime harvester
- Orb Prime is a high traffic area, making this harvester one that you and your teammates will take advantage of the most. It spawns at 9 minutes so many players will forget about it until it is too late. Swing by anywhere from the 9-10 minute mark and you'll cap it completely uncontested. Throw a ward down in the Orb Prime pit while you're there.
- Track which Heroes have keys on the enemy team
- If 0-1 enemy Heroes have keys, harvesters are likely yours for the taking. If 3-4 have keys, they'll be more aggressive in taking the harvesters as they spawn. Always keep track of enemy equipment in general, including who has picked up a key.
- Never try to destroy an enemy harvester by yourself
- You just don't have the muscle for it as Muriel. Leave this to a Jungler or Tank. You can support them and help them destroy it, but if you are trying to take one down by yourself know that your time is likely better spent elsewhere.
Buffs
Currently buffs are incredibly valuable in Paragon. Each buff provides you with a unique advantage over your enemies. Make sure you are giving each color buff to the correct class, as some Heros can take advantage of a specific buff more than others. The red and blue buffs spawn at 1 minute and respawn every 6 minutes after being taken out. The black buff spawns at 6 minutes and respawns every 4 minutes after being taken out.
- Red Buff: 20% damage increase, small max movement speed boost on hit
- We want to give red buff to our Jungler or Ranger primarily, although Tanks are a good third choice if a Jungler or Ranger is not around. Red buff gifts the carrying Hero with higher DPS and better mobility. Great buff for the Jungler to have when pulling off an early game gank, sometimes as early as level 2. The most valuable buff in the early game stage.
- Blue Buff: increased mana regeneration, 20% cooldown reduction
- Oh, man. This is Muriel's dream buff. Take the blue buff for yourself every time it is up during the mid to late game. This will supply you with an insane 20% CDR that stacks with your cap, putting your maximum possible CDR at 60%! Combine this with some mana regeneration to stay on the battlefield longer and you've got a crazy strong buff for Muriel or any Caster. Ask your teammates to help you take this buff as you are pretty week and it can take awhile to noodle it down by yourself.
- Black Buff: damage over time to structures
- In a desperate attempt to bring down the average hour-long match length, Epic recently reduced the respawn time of the black buff to 4 minutes to encourage players to put more emphasis on it. Black buff is incredibly strong for pushing down towers, granting 150 damage per second for 5 seconds, and is best suited on your Ranger. This is because they can attack/poke towers safely with ranged auto attacks, and they should already have the highes DPS on the team. Another great thing about the black buff is that it is in a high traffic area. Take this buff anytime you see it up and use it to push down towers and keep the pressure on the enemy team.
- Orb Prime (OP) Buff: activates your Prime card
- It's called "OP buff" for a reason, folks. Killing the Prime Helix Guardian and capping the Orb Prime in the enemy team's reservoir will activate all Prime cards on your team. These cards are incredibly powerful, giving you an insane amount of health or damage (depending on which card you've chosen for your deck) as well as empowering nearby minions. Note that the minion empowerment stacks with each Prime card, so it is best to group up and push for the win with a strong wave of minions whenever the OP buff is obtained. You should win 99/100 games after capping the Orb Prime.
Synergy
Rangers
- Murdock: 10/10
- Murdock is without a doubt my favorite Ranger to lane with as Muriel. I also believe he is probably the best/most universal Ranger in Paragon currently. His traps allow for safety when pushing lane and cover up our lack of wards for the first 3 minutes of the game. His kit synergizes well with Muriel as Murdock likes to get in his opponent's face for harass and armor shred. Muriel allows Murdock to win close quarters trades by speeding him up with RMB and then applying another shield/damage with E. Weave a Q in there for some damage and a slow and you've got yourself a 100-0 trade in many early game scenarios. Murdock also has a globally impactful ultimate, making his synergy that much more effective with Muriel.
- Grim.exe: 9/10
- Grim is no doubt a strong Ranger in the current meta. He has the mana to apply a slow about every other auto attack combined with a knockback and a shield, making him the most durable Ranger already. Add a utility support like Muriel to the mix and you've got a combination of a lot of CC and survivability, making this lane partnership really enjoyable and active. Grim's ultimate GTFO is an easy, brainless execute to finish off targets who escaped to their tower. Not quite as much synergy as Murdock, but definitely a solid choice and a very winnable lane.
- Sparrow: 8/10
- Sparrow loves Muriel, though it may not necessary be a mutual feeling. Sparrow is a Ranger whose success relies on good positioning and landing consistent auto attacks, as her E (passive) causes her AA's to deal increasing damage the more she lands them. Muriel can help with this by slowing Sparrow's target while speed boosting Sparrow herself. Sparrow can then finish off any escaping enemies with a long range Piercing Shot, making escape from this Hero combination nearly impossible. The weakness lies in Sparrow's lack of mobility in a game that values movement so heavily. Muriel players will be dripping sweat trying to keep Sparrow alive against the likes of backline divers like Khaimera or Kallari. Sparrow requires a lot of attention and babysitting but if played properly she can be devastating alongside Muriel.
- Twinblast: 5/10
- Poor Twinblast is still trying to find his place in the meta. His kit feels incredibly underwhelming as does his ability to carry games. He does have a strong movement ability but other than that I find his kit and damage to be pretty unimpressive. Universally considered to be the weakest Ranger in the game. Hoping for buffs in the near future.
Fighters
- Khaimera: 10/10
- Oh, Khaimera. Talk about a Hero who only has one setting: full speed ahead. Khaimera has an initiation but no escape ability, so once he is in the fight he is pretty much dedicated to it. Muriel and Khaimera work so well together because she will shield him up while he racks up his health regeneration for every auto attack he lands. He is constantly on the backline diving Rangers and Casters, making him a great option for an ult to knock up and disrupt the enemy team. Muriel and Khaimera together can often win a 2v3 or even a 2v4 if played well. Fantastic synergy. My preferred jungler when playing Muriel. Also the community's preferred Jungler at an 11% pick rate, highest in the game.
- Grux: 9/10
- Grux is high on this list for one reason alone; he's Grux. This crazy strong Hero has good synergy with everyone in the game. He is on top of the current Jungler/Fighter meta with really no competition. He can pull enemies and minions to him, charge at escaping ones or away from danger, has an AOE stun for an ultimate, and has no question the highest DPS in the game when whacking on his foes. Crazy strong Hero at the moment. Expecting nerfs sometime in the not-so-near future.
- Narbash: 8/10
- Many players have been building Narbash as a Support Fighter lately, making Narbash a viable teammate when paired with Muriel. However, Narbash should be building health, mana, and a good amount of damage to fill the damage gap that will be lacking with two support Heros on the battlefield. If played properly, Narbash will bring a good amount of damage and CC while adding to Muriel's already strong utility with an AOE heal and AOE speed boost. Pair these two ultimates together for a nasty double knock up and massive shield. Great Hero combination for a team fighting comp. Highest win rate Hero in Platinum/Diamond ELO.
- Kallari: 8/10
- Kallari's journey through the tier list has been a roller coaster since Paragon's release. After dominating in the opening stages of Paragon, Kallari received a nerf that made her the laughing stock of the game. Recently, however, she received a buff to her damage that put her back in a really good place, making her a viable Jungler again. Kallari is the only other Hero in the game with a map-wide teleport Ultimate, which acts exactly like Muriel's only offensively instead of defensively. These two Heros can turn a 1v3 into a 3v3 instantly, making it almost impossible for your teammates to get caught out. Aside from their Ultimates, however, their synergy is a bit lacking. Kallari is an assassin that likes to stealth in, throw down some auto attacks, throw her E, then jump/stealth back out. She is not a fighter that benefits from the sustained, drawn out fights that Muriel can grant access to. If Kallari gets focused, good luck keeping her alive as she is one of the squishiest Heros in the game.
- Feng Mao: 7/10
- Feng Mao is a strong Jungler that fits well into the meta, but he just isn't the best Jungler when playing with Muriel. Still a great choice and probably the most hardy Jungler in the game right now with his defensive and disengage capabilties. Muriel synergizes with Feng Mao as well as she would synergize with any melee class. Shield --> speed boost --> reap rewards.
Casters
- Gideon: 10/10
- In my opinion Gideon is the strongest caster in the game right now, and is no doubt the best Caster to hard carry with. His Q hits like an absolute truck right from the start of the game. His slow adds a bit of CC and damage, and he also has an escape move that can be used both horizontally and vertically, making him a very safe Caster. His ultimate is crazy strong and can allow him and Muriel to 2v5 when fed. Gideon is also probably the most straight forward and easy Caster to pick up, though he can have a higher skill cap with his E and Ultimate positioning along with ability to hit skillshot Q's.
- Iggy and Scorch: 8/10
- Control mage that pairs well with Muriel's ability to support. Good Caster to take for a team fighting comp that needs a bit more tankiness to it. Iggy and Scorch is by far the most durable Caster in the game, making Muriel's job a lot less stressful as he won't be getting blown up like other squishy Casters. Iggy and Scorch can be a little underwhelming and straight forward at times, but if ignored this little guy can do a ton of AOE damage without even landing an auto attack.
- Lt. Bellica: 8/10
- While Lt. Bellica's kit doesn't necessary go hand-in-hand with Muriel's, I think Bellica is in a really strong spot after her release. Her mana drain adds a bit of caster utility to the team, and her ultimate hits like a truck on Heroes whom are out of mana. She fits in the meta and is currently the most played Hero in the game at 11.2% one week after her release. Tip of the hat to Epic games for giving the community yet another fun, unique, creative, and well balanced Hero that Paragon players have reacted extremely positively to.
- Gadget: 7/10
- Gadget received some buffs to her damage and Ultimate range in the same patch as the Kallari buff, which really put her in a much better position than she was. Her win rate sky rocketed to the top Hero at 52.8%, making her a good choice for any team composition. However, her kit still does not synergize with Muriel all that well. Gadget is a great split pusher, annihilating minion waves with her Q or Ultimate and speeding up friendly minions with a speed gate. Muriel can bail Gadget out of getting ganked while split pushing with a Reversal of Fortune paired with Gadget's speed gate and Muriel's Alacrity to retreat. A viable pick in the current meta, but not my favorite Caster to have on my team as Muriel.
- Howitzer: 5/10
- Shame on you for picking Muriel with a Howitzer on your team. This is more than Dekker's dream teammate; it's the love of her life. Seriously, Dekker/Howitzer is the most powerful synergy in Paragon right now, as their Ultimates just go together hand-in-hand. If you see a teammate pick Howitzer, just play Dekker. You don't even need to know how to play her in order to win with this Hero combination. Just catch as many people in your Ultimate as possible and let Howy's Ultimate do the rest.
- Muriel doesn't have a lot to add to Howitzer's kit. Just let him farm in a solo lane and get strong on his own, shielding him in team fights when necessary. Howitzer does have a get out of jail free card with his ultimate, so he shouldn't need much babysitting.
- The Fey: 5/10
- What you need to find out here is what role your allied The Fey is interested in playing. If she is trying to fill the Energy Damage/Caster role, Muriel is still an okay pick. However, if she wants to fill the Support role you should switch off immediately. The Fey is a Support/Caster that can really do either, but her specialty is in area control and CC. Not the greatest synergy, as I feel like The Fey is more suited for the Support role. Consider playing this Hero yourself if you enjoy playing Muriel.
- Dekker: 3/10
- Please, no. Dekker is the only other true support in the game. There is never a situation where you want to have both these Heros on the battlefield together. If a teammate picks Dekker, do not play Muriel.
Tanks
- Greystone: 10/10
- A Greystone with a Muriel on his team should never die unless caught severely out of position. This Hero will starve the enemy team for xp once he gets his ultimate since he just can't seem to ever die. Greystone is extremely, naturally tanky with a good bit of damage to boot. His RMB allows him to leap long distances and over terrain, making him fairly mobile and safe. He is disruptive tank that is a backline diver, the kind of Hero Muriel loves to support. Great target for Muriel Ultimates as it gives him a 3rd chance before dying and provides a 2nd knockup along with his own Ultimate. Greystone is probably the easiest Hero to play since half of his abilities are Passive, and his Q is just AOE damage around him. An unbelievably hardy Hero combination that doesn't get taken advantage of often enough. By far my favorite tank to have on my team.
- Steel: 9/10
- The face of Epic's tank class and entire game of Paragon, I find Steel to be in a pretty good place at the moment. His auto attacks hit really hard early game while still being a healthy tank, making him a great brawler in the early-mid game after he gets a couple cards. His kit is so universal, providing him with a two damage mitigations for both himself and his teammates, a knock back, and a long-range AOE knock up/stun initiation. Steel is a great teammate to have as far as the tank class goes. Takes a lot of pressure off of Muriel to be the team's only utility.
- Sevarog: 8/10
- Sevarog is a tank that brings some scary damage to the table in the mid-late game. Sevarog wants to be left alone in lane or jungle to farm up his Siphon ability, which causes his Q and Ult to grow in power at 20/40/60/80 stacks. His auto attack hits for a colossal 50 damage to start the game, making it one of the hardest hitting AA's currently in Paragon. Sevarog also has a root and a dash that ignores units, increasing his survivability for situations where health and armor just won't cut it. Not really a backline tank, which makes Muriel's life easier but not necessarily better. Good tank to have in your front line protecting teammates and dishing out some damage.
- Rampage: 7/10
- Don't get me wrong, Rampage is a great Hero and one hell of a tank. His kit just doesn't synergize with Muriel's all that well. His rock throw and leap give him a lot of solo utility, and he is nearly unkillable in the jungle. Combine these with his Ultimate to make Rampage the most Rambo Hero in the game. Rampage loves to go on solo missions, split pushes, and tower dives. If he finds himself in a sticky situation he can just Ult and leap away. Rampage doesn't really rely on help from Muriel, so her time is better spent supporting other members of the team. That being said, Rampage is in no way a bad tank and is absolutely a healthy choice for any team composition.
- Riktor: 5/10
- Riktor is a Support/Tank that really fills the Support role. You don't have to switch off Muriel if Riktor is your only tank, but if you have Riktor and another tank or support I would highly recommend switching, as your team will need more damage at that point. Riktor's kit is all about CC'ing enemies and setting up kills. The biggest problem with this Hero combination is the severe lack of damage between the two of you. Riktor's energy damage scaling is not great, so he benefits more from stacking health, mana, and armor. Overall there are better tank synergies out there for Muriel.
How Good is Muriel?
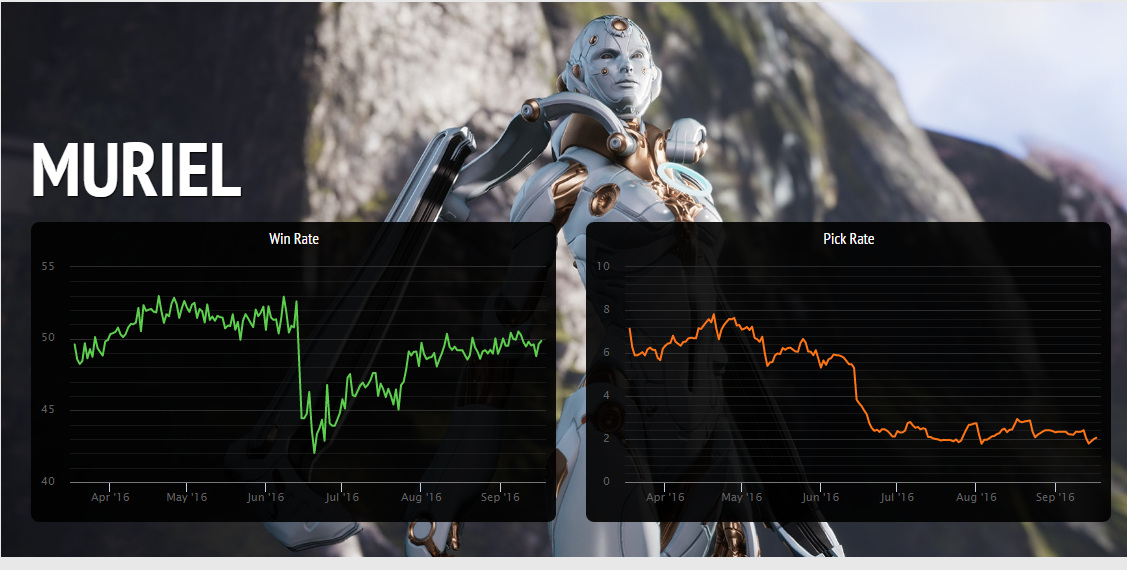
- Muriel was seeing peak results around a 52-53% win rate right before the patch hit in June. This patch removed all Passive abilities from Heros, which removed Muriel's really strong ability to Passively restore health to nearby allies. This hurt her utility and caused her win rate to plummet to an all time low 42% immediately, and her pick rate soon followed. She is now operating around a 49% win rate and 2% pick rate, identical to Dekker's. Muriel and Dekker are both in really good places right now to make up a balanced pair of true, utility supports.
- It is interesting to note that Muriel's win rate and pick rate both rise with her ELO.
- All: WR - 49.6%, PR - 2%
- Bronze: 45.75%, 1.4%
- Silver: 49.2%, 1.9%
- Gold: 51.3%, 2.3%
- Platinum: 53.7% (3rd highest in game), 3.6%
- Diamond: 55.9% (5th highest in game), 43.%
- This shows the value in mastering this Hero and how high her skill cap really is. She can be simple to do well with on the surface level, but there is a lot of counter play options for Muriel and your decision making/map awareness have to be top of the line in order to get the most out of her potential. She is absolutely a Hero worth putting a lot of time into if you are serious about becoming a Support main in Paragon.
Initiation
Remember that every Hero in Paragon currently has a built in initiation ability - Travel Mode! When out of combat for 5 seconds, your Hero will begin to travel much more quickly than your in-combat movement speed. This means that any time you want to initiate on a Hero in lane, all you have to do is stop auto attacking and run up to them in Travel Mode. Here, you can lay down an E to shield yourself and damage your opponent, slowing him down with Q to keep him inside the bubble. Then toss back your RMB to speed up your allied Ranger so he can toss in some auto attacks of his own. Muriel's autos can pack a punch at the early stages of the game, so often times you can score a kill at level 3 or 4 when your opposing laner has not yet reached his ultimate. Never initiate on an enemy who has hit level 5 before you have. You will lose this fight 9 times out of 10.
Epic has stated in the past that they have plans to remove Travel Mode from the game and replace it with a different movement aspect. However, they have not yet released any specific plans or dates as to when and how this change will occur. My guess is that Travel Mode will remain in the game for quite some time through the open beta. How they will go about replacing it is anyone's guess at this point.
Ganking
Travel Mode makes Paragon a much more read-and-react kind of MOBA than its League of Legends and Smite counterparts. Rotations are extremely important in the meta causing all Heros to bounce from lane to lane at any moment's notice. The rotation meta means even supports like Muriel have opportunities to sneak up on an enemy for a gank.
Ganking should be done when an enemy is out of position too deep into the lane away from his tower. When ganking, always approach your enemy from behind, even if it is a longer route to do so. Be patient and wait for the perfect opportunity to reveal yourself. Since the game is 3rd person, you can never see directly behind your Hero, so the element of surprise is absolutely a factor. Position yourself far enough behind the enemy so that you will not be out of range if they were to use a movement ability. Be knowledgeable of enemy Hero abilities and how they might react to escape the gank or even turn to attack you.
Hit your enemy with an auto attack - Q - auto attack to get the gank started. You then want to immediately toss down a speed boost orb for your ally to pick up and help out with some damage. Wait for the enemy to use his movement ability before laying down your E for some more damage. Note that the enemy will probably be focused on escaping rather than attacking at this point, so it is more important that you hit the damage portion of your E rather than shielding yourself. To do this I will lay the close edge of the bubble right where the enemy is standing at the time, making a huge AOE for him to walk back through. If the enemy wants to avoid the damage from your E he will have to stay put and fight or go around it, which will often lead to him taking more damage than he would have in the first place. Though she may be a support, Muriel is an extremely efficient gank Hero especially in the early-mid game stage due to how much CC/utility she brings.
FAQ:
- Is it a bad idea to fully upgrade Lord's Ward first since it doesn't give you a fully upgraded bonus?
- Yes. You lose out on some fully upgraded stats that you would have had earlier had you put those 6 points elsewhere, i.e. spending your 6 points on your second back to buy a Pendulum of Lords and slot it with a 3 point mana upgrade. This allows you a fully upgraded item on your next back (after another 2/1 mana upgrades) paired with two other flat items (Lord's Ward + your choice). Skipping the upgrades on your ward allows you to reach those fully upgraded bonuses more quickly. For this reason you should always put upgrades into your Lord's Ward (or any other card that doesn't have a fully upgraded bonus, such as Circlet of Health) as your last card points after you have maxed out everything else. This is very rare as you typically won't reach full build in most Paragon games at the moment.
- Should I be last hitting minions?
- In theory, no. In MOBA's it is the job of the carry to last hit the minions while the support does things like harass and sustain. This is because you only want to last hit the minions, causing the wave to push toward your tower for easier zoning. That being said, it is still very early in open beta, and some Rangers aren't very good at last hitting yet. Card points are essential, and missing out on critical last hit experience/cxp is detrimental to the success of your gameplay. If you notice your Ranger is having trouble last hitting, politely ask in chat if you can last hit for him. Paragon allows all players within range to split the benefits of cxp earned, so it really doesn't matter which one of you gets those last hits. I find Muriel extremely easy to last hit with in the early game compared to other Heros. TL;DR Ranger should last hit but sometimes if you want something done right you gotta do it yourself.
- Wait, you put mana in your first three upgrade slots? What happened to CDR? Shouldn't I be rushing the 40% cap?
- Many players like to rush 40% CDR immediately, which is in no way a bad strategy at all. What I find useful about rushing some mana early is that you give yourself the sustain to stay on the battlefield longer before backing. 40% CDR is useless if you don't have the mana to cast your spells when they're off cooldown. I like to reach a minimum of 6 card points if possible before backing, because I feel like this is an optimal utilization of my time. Paragon is all about using your time effectively, as time = cxp. The more mana you have, the more time you can spend getting stronger instead of sitting in base waiting for your mana pool to refill.
Shameless Plug
- Thank you for checking out my Muriel guide. I am pretty active in updating, editing, and reviewing this guide, so if you have any questions or input please comment below and I should respond fairly quickly. Also, if you ever want to play Paragon with me, feel free to add me (Brissle) in game. I play a few games almost every afternoon and some evenings throughout the week days. Now get out there and save some lives on the battlefield of Agora.
Shameless Pug
@Brissle, Hi there. Tell me when you are done with the guide and ready to go public.
@George Thanks, will do. I'm making it pretty in depth, but working hard on it today and hoping to go public tomorrow. I will let you know.
@George The guide is still in progress, but I am ready for it to go public any time as I continue to update it. I definitely think I have enough solid information here to get the ball rolling.
@Brissle, Sure. Let's get it to public. :)
Gotta say this is beautiful :D, great work Brissle!
Thanks, @ MysteryPayne1, your guide has some great stuff as well, and really inspired me to create this. More to come!
@Brissle, That's an insane amount of information! Outstanding job. I'll reserve some time to read it completely through :)
@George, Thanks for doing so. It took quite a bit of dedication! Hoping to help lots of Paragon players out there who want to get better at Support. Let me know if you have any recommendations.
@Brissle, Will do but only after I read it all through :)
By the way you might be willing to share a link to your guide via Reddit or via Paragon official forum. This way you will not only increase visibility but may receive more feedback from people who not only come here to read but also want to contribute by comments.
@George, I'll definitely look into doing both of those then. Since it is my first guide, I have a couple technical questions in case you or anyone else can answer them. How do I include links in the table of contents at the beginning so that it will scroll down the page to that topic? Also, is there a way to include a "Back to the Top" button?
For TOC creation you will need to switch to "source" mode of the text editor and insert something like this into heading tags:
<h2 id="toc-intro">
Then switch back from the "source" mode and insert links as hash-references using those IDs. See an example I have applied to your guide.
As for the "Back to the Top" button - good idea. This will be done globally for all pages with long scroll. Stay tuned.
@George, Thanks!
Wow awesome Guide bro.
Looking forward to play with you a few times :)
@Bierbauchchief 1, Sounds good!
Couldn't you use shepard's phial instead of the Mana potion? Because It can heal your allies while you regenerate some mana
@Bierbauchchief 1, Yep, someone pointed that out to me on Reddit recently. Going to edit my deck build toinclude that option soon.