

So, you want to improve?
Hello, you've seen the title and one of two thoughts have probably crossed your mind: "Ha! This should be good." or "Interesting, let's see if I can learn something new." Either of those thoughts is acceptable in my eyes, either way, you're sitting here now and reading my words so let me tell you about this guide.
My aim here is to educate you on the finer details of Paragon and give you some insight into the higher levels of play and how to improve your gameplay beyond the basics. If you've come from other MOBAs then a lot of this is going to be familiar to you, I'll be talking about things like warding, zoning, counter building and lane control. If you're a veteran from a previous MOBA then this might be a little boring for you, but if you're the average LoL, DotA, Smite or HotS player or new to the genre entirely, then this should be of some interest to you.
Warding
Warding, in layman's terms, is setting up wards around the game map to give you the vision of major choke points, objective areas and frequently travelled routes which allow you to get the jump on your enemies or retreat before they ever get close to you. In short, warding wins games. Sound crazy to you? Well, it's not, the primary reason why people die in MOBA's is because they were caught off-guard, warding helps to prevent this issue and properly placed wards will feed you a constant stream of information, not just to you but your entire team. Added to this, warding important objectives (Black Buff, OP Buff) will also give you the opportunity to intercept enemies whilst they're trying to take these objectives, usually netting you some free kills and the buff for yourself.
So, how do you ward? Good question, you'll need a special item and some map awareness, but not to worry because I've got you covered on both of those. First of all, there are two types of ward in the game.
Standard Wards
- Supplied by the 1 cost card: Scout's Ward
- Can be seen by everyone
- Has one charge
- Take 5 hits to be destroyed
- Provide vision on mini-map
- Make an audible pinging sound when an enemy is within range
Shadow Wards
- Supplied by the 3 cost cards: Assassin's Ward, Brawler's Ward, Guardian's Ward, Lord's Ward, Magus' Ward, Sage's Ward and Sorceror's Ward
- Invisible at all times
- Has two charges
- Cannot be destroyed currently (as they're invisible)
- Provide vision on mini-map
- Make an audible pinging sound when an enemy is within range
Standard vs. Shadow
Some advantages were made clear in the previous comparison but others were not. The Scout's Ward, the only item that will give you access to standard wards does not give you any stats, though its price does give you the ability to purchase at the start of the match and then sell it later on. As you can see, there are a wide variety of advanced wards available with all manner of stats on them, so make sure you're taking the right stats for your chosen hero.
The other not so clear advantage to upgrading your ward is that you have two charges available, which refill when you return to base, this allows you to not only place a ward twice each time you recall but actually allows you to have multiple wards active at once. This then is a clear advantage because being able to see more map means that you're able to be aware of more potential hazards.
But Warding is the Supports Job!

Warding might have traditionally been the support's job in other MOBA's but not in paragon, why else would EPIC provide us with not one, but 8 different ward options? This is a backwards mentality, the only people who are excused from buying wards are those who are buying keys (covered next), but everyone should have at least one of these items.
Placing Your Ward
OK, so we know what a ward is, we know what they do and we know how to get our hands on some, but how do we actually use them? Well depending on whether you're playing on PC or PS4 you'll either have your quick slots bound to 1-4 on your number keys or your D-Pad. All you need to do is hit the corresponding button and you'll have a ghostly blue ward floating in front of you. Simply position the ward where you want it and hit your auto attack key (LMB/RT), this will then "spawn" the ward into the game world and a mesh net will immediately expand outwards, this indicates the wards radius, and all alerts will sound once an enemy enters the net.
Where To Put Your Wards
Now we're cooking with fire and starting to ask the important questions! Where are good places to ward? Well I can show you on this handy mini-map I found floating around the internet, you do not have to place wards in these areas, but this serves as a good guide on where they'll be the most effective.
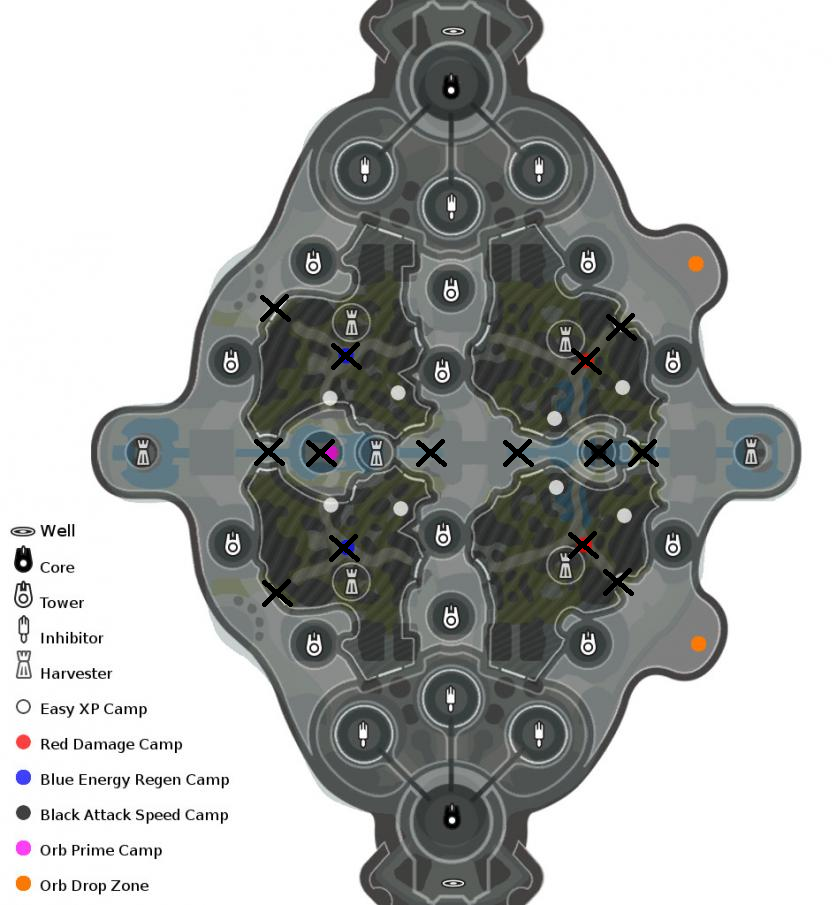
OK, don't panic, there are a lot of locations on this map but I'm going to break them down for you, the marks across the center of the map are the most important, from left to right they are: entrance to left lane from jungle, OP Buff, left entrance to middle lane from jungle, right entrance to middle lane from jungle, Black Buff and entrance to right lane from jungle.
These are the most important areas to have wards active, and you want to set them up closest to the areas that will concern you, for example, if you're laning in the right lane, then you want that entrance from the jungle covered to allow you to avoid ganks and potentially catch an enemy off guard. Once you get into mid-game you want to have a ward active at OP Buff at all times, this will allow you to intercept enemy attempts at taking the OP and let you know where they are.
Following the middle markers the next most important ward locations are the red and blue buffs, these not only give you a nice boost to your performance but award you with a massive 600CP which makes a huge difference early game, and even late game. If you have these warded then you'll know where the enemy jungler is, if they've taken the buff yet and also be able to intercept them when they're heading for it.
Finally the alternate jungle entrances to the lanes are marked, these are less important but if you're facing an aggressive team they can really save your ass. You might notice that the middle lane entrances aren't marked but this is because they're covered by defensive buff wards.
Aggressive & Defensive Warding
Much like you can play aggressively and defensively you can also ward to match your playstyle, even if you're dominating the game wards can really help you out, by covering enemy jungle exits and buffs you'll always get the head start on the enemy hero and be able to avoid bad situations without missing a beat. Adjust your ward strategy depending on your playstyle, if you're gaining a lead push your wards up, if you're getting pushed back, bring them closer to home. This will allow you to react to enemy movements and let you monitor the battlefield.
Wards, The Future
Warding is one of the easiest things you can do in Paragon (or any MOBA for that matter) but out of all the things you'll read in this post, warding is the one thing that will consistently improve your gameplay for the least time investment, wards will win you games, in war information is the key to victory.
Oh and one last thing, people who purchase wards and NEVER USE THEM really, really, really grind my gears, so if you have ward card? USE IT!
Harvesters & The Key To Their Heart
Harvesters are something new that Paragon brings to the table and as such a lot of people don't really understand their purpose, which unfortunately means that they go ignored a lot of the time. There are seven harvesters in Paragon, all of which can be captured in between 3 and 30 seconds depending on your items. You have the two harvesters close to your base in your jungle, you'll see these utilised the most as they're the most visual of the harvesters, both teams have two in their jungle, one on each side (left/right) of the map. Then you have the two lane-harvesters, these usually go untouched for the entire game and finally the OP Buff harvester which us also rarely used. A captured harvester will generate CP on a timer that you can then collect, if the harvester fills to maximum capacity it will stop generating the CP and it'll go to waste.
Much like the wards, there are key equivalents that relate to the harvesters.
No Key
- Harvesters take 30 seconds to capture
Basic Key
- Provided by Harvester's Key
- Harvesters take 6 seconds to capture
- One charge
- Costs 1 CP
Named Harvester Keys
- Provided by the 3 CP Brawler's Key, Guardian's Key, Lord's Key, Magus' Key, Sage's Key
- Provided by the 2 CP Executioner's Key, Reaper's Key
- Harvesters take 3 seconds to capture
- Two charges
Using Your Harvester Key
To use your harvester key all you need to do is stand on the pad, and the charge will be consumed once the harvester has been built, this will take either 30, 6 or 3 seconds depending on the card you have.
The Importance of Harvesters
Each harvester your team owns will generate around 320CP with the time it takes to fill up being 5 minutes. You should always control at least two harvesters, those which are in your jungle; so this will net you 128CP per minute for your entire team as long as they're being maintained, or broken down, each harvester will generate 64CP per minute.
However there are actually 7 harvesters that you can control at any given time, they all generate the same amount and work the same way and owning all 7 is unlikely. That said, due to the negligence that most people give harvesters it's highly likely you can control the 2 side harvesters and the OP harvester with little to no competition, which would then increase your CP gain to 320 a minute. If you weren't interested before I bet you perked up as soon as your read that you can gain 320CP per minute by just running to your harvesters every now and then, and making sure you don't let them cap. Your team will almost certainly help collect the two jungle harvesters, but will likely ignore side lanes and OP buff, so you should deal with those.
Harvester Spawn Times
The Jungle Harvesters spawn 3 minutes.
The Lane Harvesters spawn at 6 minutes.
The Prime Harvester spawns at 9 minutes.
To Summarise the Humble Harvester
If you can control 5 harvesters you will have a huge CP advantage over the enemy team, let's do some maths here shall we? Say you captured your Jungle, Lane and Prime Harvesters at 9:06 (assuming standard key) by the time the match reached 35:00 you would have gained a massive 11,168CP if you were perfect, but that's not going to happen so let's instead say that for 5 minutes you had accidently let some harvesters cap. Not a problem, you'll still have generated 9,568CP for you and your entire team.
Harvesters are love, harvesters are life. Don't ignore them.
Zoning
Chances are that you've heard people talking about zoning and thought, "What the f**k is zoning?" well I'll tell you a little bit about it. Zoning is when you control your enemy movements by using your area of influence to push them away from desirable objectives, I might have lost you there.
Area Of Influence
Imagine your hero is standing on the fields of Agora, now imagine that your hero has a nice circle around them on the floor, this circle's size is indicated by your attack range, whenever anything enters your circle you can damage it, and thus, this is your area of influence.
Although you cannot see this imaginary circle you can certainly use it to your advantage once you've learnt just how large it is, you can zone your opponents by making sure that your area of influence is over objectives that they want to take, which will prevent them from entering your area of influence or force them to take damage if they do.
For example, if your minion wave and the enemy minion wave are fighting in the middle of the right lane and you both want to last hit for CP, you want to position yourself by the enemy casters, this does two things for you. The first is that it allows you to protect your minions from enemy attacks and puts you in range of all potential last hits and the second is that it prevents your enemy from getting close enough to your minions to last hit.
Isn't that called overextending?
Now zoning isn't without its risks but if you've read the ward section of this guide then you already have your back covered, the most important thing you can learn is the range of each hero in the game, this will allow you to safely trade where possible and keep yourself out of your enemies area of influence, whilst abusing yours. You'll notice the difference between players who practice this principle, and those who don't, by the way they attack you. Experienced players will be dancing on the edge of your area of influence, hitting you and then back-stepping your shots, inexperienced players will try and get up in your face and end up being slaughtered or shoot at you whilst you're too far away and end up missing.
Zoning is not a quick thing to learn as every hero has a different range on their abilities and attacks, but once you start trying to work out the attack ranges you get a feel for it and with practice you'll be able to win most even matchups due to the fact that you can step in and out to do your damage whilst completely avoiding theirs.
What If I'm Melee?
Zoning isn't just limited to ranged characters, the melee classes also have area's of influence but they're a lot smaller. This is important to note as it will allow you to kite more effectively, and once you get the feel for it, you can attack, backstep, attack, backstep etc. - alternating your attacks and movement to avoid the movement penalty and letting your opponent swing aimlessly at you whilst you keep your distance, it's harder to pull off than ranged kiting but it can be done.
It will take you some time to learn how to zone correctly, those with high-end MOBA experience will already be putting it into practice so keep an eye out for them, but start imagining circles around everything in the game and reacting accordingly, eventually you'll be able to dance like a master.
Map Awareness
Map awareness is probably the most obvious thing you'd expect people to do by default, but shockingly they don't! I've seen no end of people sitting next to a ward that's pinging due to enemies and the player doesn't notice and proceeds to get murdered 5 ways to Friday. It's a sad thing to see, the thought process was there, they covered their back correctly but they failed to notice their own warnings.Look at your map, not every minute, not often, ALL THE TIME.
ou don't need to be staring at what's in front of you whilst traveling or last hitting minions, once you get a feel for those things you can focus more attention to the more important parts of the game, and that's primarily located in the top right corner.
Why is map awareness important?
Map awareness is important because it gives you an overview of your surroundings, at a glance you can see where your allies are, where your enemies are (or aren’t) and then use that information to make a calculated decision on how you should play. Every single top tier player will be doing this, you’re not going to catch them out of position because they’re aware of what’s happening around them, all of the time and they’ll then communicate that either via VOIP or pings to their team.
Map awareness and wards combined are how you can avoid almost all unnecessary deaths in the game, and it’ll also help you secure kills because you’ll know that your Grux is taking the red camp and only a few seconds away from being able to assist you, you’ll know that the enemy Kallari hasn’t been seen a while and thus could present a threat to you if you push too far and you’ll know that the enemy is making a play for the OP Buff because your wards will be notifying you as they enter the area.
Map awareness isn’t only important, it’s vital to Paragon, and any other MOBA for the same reasons, it’s there for a reason, make the most of it.
When do I have time to look at the mini-map?
It might seem impossible if you're just starting out or are used to ignoring it, but you need to start glancing at your map every couple of seconds, the time it takes to do that will tell you whether you need to look more closely (enemies missing) or if you're good to continue because everyone is accounted for. Make it a habit, make the time to do it and keep doing it, you'll notice that you're dying less and less the better you become as enemies simply won't be able to catch you with your pants down.
Map Awareness & Warding, The Perfect Couple
If you're going to take the time to lay down your wards, then take the time to start using your map. It's a tool the game provides you with so make use of it to its full potential, it's your lifeline and without it you're just asking to get yourself killed.
Jungle Timers
Jungle timers are vital if you're playing a jungler, as you may have guessed. Not only will you be able to predict when the enemy buffs will be respawning but you’ll be able to make sure that you’re always there when it matters, the minimaps circular respawn bars are nice, but they’re not entirely accurate. This will be a shorter section but I’ll detail the buff, what it does, its uses, how long it lasts and how long it takes to respawn.
White Camp
Buff: None
First Spawn: 1:30
Respawn Time: 2 minutes
Contains: 2 white monsters
HP: 345
Red Camp
Buff: 25% Increased damage & movement speed on hit
First Spawn: 02:30
Respawn Time: 6 minutes
Contains: 1 red minion, 2 white minions
HP: 1012, 345
Power: None
Blue Camp
Buff: 25% Increased mana regeneration & cooldown reduction
First Spawn: 02:30
Respawn Time: 6 minutes
Contains: 1 blue minion, 2 white minions
HP: 1012, 345
Power: None
Black Camp
Buff: Increased structure damage, increased attack speed
First Spawn: 06:00
Respawn Time: 7 minutes
Contains: 1 black minion
HP: 3500 > 7000 > 10000 > 13000 > 17700 > 22500
Damage: 40 > 60 > 75 > 90 > 105 > 120
Power: Increases HP & Damage each time it dies
Purple Camp
Buff: Increased minion HP/damage & activates Prime Helix card
First Spawn: 05:00
Respawn Time: ???
Contains: 1 Prime Guardian
HP: ???
Power: None
NB: All timers and values are correct as far as I can find, testing required to confirm, take with a grain of salt.
The Buffs
Ok, so as you can see there are four buffs that can alter your gameplay in Paragon: Red, Blue, Black and Purple. Each of these buffs has unique effects and as such can be used in different ways.
Red
The red buff has long been a favourite to begin jungling with, most people know that it increases your damage but surprisingly few know that it also increases your movement speed on hit. This makes it the ideal choice to pick up first as it helps you travel to each jungle camp faster and as such allows you to gain more CP/XP per minute. Red buff is also excellent when it comes to ganks, the extra damage has obvious benefits but the additional movement speed can really help you stick to enemies and secure kills. Red, in particular, should always be taken when it spawns, especially for melee heroes, don't let it go to waste.
Blue
Blue isn't taken as often as red because it's less useful to the jungler, with the exception of Kallari every jungler can do just fine without it because it only affects mana regeneration and your cooldown reduction, which let's be honest isn't a priority for melee heroes in general. The first blue (again with the exception of Kallari) should be given to your support, or if there is no support, your mage. From there on you should always be taking blue to pass to your support or mage so that they're better able to hold their lanes and assist your team.
Black
I feel sorry for the black buff, though it is risky to take without assistance it's largely ignored and most people I've asked have no idea what it actually does, a few know it increases your damage vs. structures (which is actually quite significant) but it also increases your attack speed, due to this you want to be giving the black buff to your teams ranger as they can make the most use out of it. Black buff is always worth taking before a push attempt and especially when you have the OP Buff.
Purple
Otherwise known as the OP Buff is another buff with a little-known effect, sure it’s obvious that it activates your Prime Helix card but it also increases the damage and HP of your minions which can prove devastating if you’ve taken a few inhibitors out. The OP buff gives you a massive boost in either damage or health so try and capture it when all of your team is alive for the maximum effectiveness and try to push whilst it’s active, when working together the power boost will win games.
Building Your Cards Effectively
With Paragons deck building system there’s a lot of confusion around how you should build a deck and what the most efficient way it, I came across a little-seen post on the forums a long time ago and have been using their suggested build ever since, the recommended format is to build 9cp, 9cp, 10cp, 10cp, 10cp and 12cp in that order, which nets you the most stats for CP possible at every point during the match.
The aforementioned post can be found here and I give Indure full credit for their idea.
In the post you can read the logic and why this build works out better in the long run, along with giving you a 60CP build by the time you’ve built all of your items. Though I don't agree with his deck-building theory entirely it still has some good points, but primarily I agree with the way he constructs the deck during the game, rather than how he chooses his cards.
I've found the 9|9|10|10|10|12 build to be extremely effective and encourage you to start building in a similar way, whilst there will be exceptions to the rule in 8/10 cases this is going to be the most efficient route to take, the exceptions, of course, being cards with active or passive effects that do not net you with any stats.
Does it Really Matter?
In many ways, yes it does. If you spend your CP efficiently you will consistently outperform enemy players who do not. You will have more stats throughout the entire game and will be more evenly matched even if you're behind, this does assume that you have a build which largely consists of cards with stat increases when completed.
For example, you (Murdock) are playing against an enemy Murdock so you both naturally have the same stats to begin with, and you've both picked up a Micro Nuke for 3CP. You decide to take the 9CP upgrade route whilst your enemy takes the standard 12CP upgrade route. You both farm until you have 9CP and recall to your bases. You buy 3 Cast cards and a Riftmagus Scepter whilst your enemy buys 3 Major Cast cards. You then both return to lane. You now have 76 energy damage and 8% crit chance vs. his 90.9 energy damage and 4% crit chance. Oh dear, that didn't work out did it? Well stick with me! You both grind another 6CP and return to base. You upgrade your Riftmagus Scepter with two Wound cards and a Cast card, completing the item and he buys his Riftmagus Scepter and 1 Major Wound card. Now you both return to lane again you have 98.8 energy damage and 28% crit chance vs. his 98.5 energy damage and 20% crit chance, so now we're pulling ahead. You've both been playing for a bit and have 12CP to spend. You purchase another Riftmagus Scepter and slot it with two Wound cards and a Major Cast for 10CP, leaving you with 2CP. Enemy Murdock slots a Major Wound and a Major Cast into his previous Riftmagus Scepter, purchases another and puts a Major Wound into it. At this point, you have 136.7 energy damage and 48% crit chance vs. his 136.4 and 52% crit chance, but you have 2CP remaining. So you keep going, team fights come and go, you're both evenly matched and eventually hit the 60CP limit. In the case you both purchase the same items (likely as a Murdock mirror match) you compare as follows:
I just accidentally proved this card theory as false. Well shit...
So, to work out how much I'd gain from following this format to gain the extra card I broke all of the stats down, if you were interested we ended up with 326.2 energy damage and 72% crit vs. 280.3 energy damage and 100% crit in the interest of keeping the cards as close as possible I matched the 2CP cards I chose with the 3CP versions, which made the enemy Murdock's build a bit wonky but nevertheless I then took 1CP (7.6) worth of energy damage and 1CP (4%) worth of crit and divided that by the totals. That calculation gave me the total card point value of both builds, taking item bonuses into effect. Note that the Agoran Scepter bonus isn't convertible so it's excluded and I chose to take Meltdown as my final card so I had to take the 16 points of armour pen into account that added 1CP to my total.
The final build was: Micro Nuke, Riftmagus Scepter, Riftmagus Scepter, Agoran Scepter, Riftmagus Scepter and our extra card was Meltdown.
My total CP value: 62
Enemy total CP value: 62
As unbelievable as I thought it was, it seems that sacrificing a card for pure 3CP upgrades (12|12|12|12|12) is just as efficient as building a 9|9|10|10|10|12 build in the end. Although this did prove to be a false strategy, after the first item our Murdock did stay marginally ahead in terms of stats, but not enough to really make a noticeable difference. So is it worth following this build? If you're being 100% efficient then yes, it will perform marginally better but does it really matter? No. Build how you like, I should have done the maths in the first place!
Will test this on another build to see if it's a fluke or whether this is total bollocks! :D
So I did some testing maths...
OK, I went online and took the top rated Murdock build and then ran through a theoretical game where I built the same deck a different way. https://agora.gg/deck/6838/murdock-pieceofbum is the build I used for this and all stats take item bonuses as well as cards into account. ED = Energy Damage, C = Critical Strike, AS = Attack Speed, LS = Life Steal.
The XCP value represents the CP worth of the build at each given point, this is calculated by taking each stat and dividing it by its 1CP equivalent, for example:
300 energy damage / 7.6 (1CP of energy damage) = 39CP worth of energy damage
I did this for each stat respectively where ED = 7.6, C = 4, LS = 4 & AS = 6.5.
It is also important to note that I rounded each CP value to the nearest whole number with anything at .5 or above going up and anything below going down. It was quite a lot of numbers to keep track of due to the cards and items providing stat increases at certain thresholds so I can't say it's 100% accurate, I believe it to be pretty damn close though, feel free to check my maths or point out errors though please :)
Recommended (9/9/9/9/12/12)
-
15CP = ED: 98.8, C: 4% - 14CP
-
30CP = ED: 189.8 (+91), C: 12% (+8%), AS: 13 (+13) - 30CP
-
45CP = ED: 189.8 (+0) C: 16% (+4%) AS: 21.5 (+6.5) LS: 56 (+56) - 46CP
-
60CP = ED: 227.7 (+37.9), C: 48% (+32%) AS: 21.5 (+0) LS: 72 (+16) - 63CP
12 x 5
-
15CP = ED: 98.5, C: 4% - 14CP
-
30CP = ED 204.5 (+106), C: 8% (+4%) - 29CP
-
45CP = ED: 257.5 (+53), C: 16%, AS: 32.5 - 43CP
-
60CP = ED: 257.5 (+0), C: 32% (+16%), AS: 39 (+6.5), LS: 48 (+48) - 60CP
10 x 6
-
15CP = ED: 98.7, C: 4% - 14CP
-
30CP = ED: 212.5 (+113.8) C: 8% (+4%) - 30CP
-
45CP = ED: 212.5 (+0) C: 40% (+32%), AS: 26, LS:16 - 46CP
-
60CP = ED: 250.4 (+37.9), C: 64% (+24%), AS: 26, LS: 40 (+24), - 62CP
9/9/10/10/10/12
-
15CP = ED: 91.2, C: 4% - 13CP
-
30CP = ED: 197.5 (+106.3), C: 8% (+4%) - 28CP
-
45CP = ED: 197.5, C: 36% (+28%) AS: 26, LS: 16 - 43CP
-
60CP = ED: 235.4 (+37.9), C: 68% (+32%) AS: 26, LS: 40 (+24) - 62CP
So the overall consensus is that whilst some builds are better than others, it doesn't really matter how you build, at best you're gaining 22.8 energy damage so it's not going to be a game changer overall. I'll be leaving this as an internal discussion to myself so that I don't lose any reasoning or logic by pruning it.
Consensus: Build how you'd like, it's a very minor difference. 9/9/9/9/12/12 was optimal for this build, but it only pulled ahead with 1CP worth of stats.
Game Strategies (And How To Beat Them)
Deathball
There's been a lot of controversy around the Deathball tactic, and it's mostly people saying that it negatively affects the game experience and turns it into a brawler, rather than a MOBA. This is by all accounts, false. The reason Deathballing works is because the majority of players are playing Solo Queue games where they have little experience with the game and game genre, however, the humble Deathball crumbles under a bit of pressure from organised players, it's also very high risk because if you fail to gain any kills early on you've screwed yourself massively for the duration of that game.
So how do you fight against a deathball? Simple, you use wards as we discussed earlier. Using the Split Pushing strategy (listed next) apply pressure to their towers whilst 3 of your teammate defend your tower, this should be enough to decimate the minion waves before they can cause any real damage. When they give up on that tower and move on, watch the map. As soon as they're no longer visible retreat back to your tower and prepare to defend, whilst one of the original defenders comes to help, the other two can then start pushing that lane.
Wards and map awareness will counter a deathballing team every time so pay attention, there's no excuse to be caught anywhere but your tower and if your team is too bad to assist you in pushing or defending then the chances are that you were destined to lose anyway, you unfortunately, can't choose your teammates (unless you're pre-made) but you can provide the vision for your team to give them the chance to survive.
Split Pushing
Split pushing is the act of pushing multiple lanes simultaneously, forcing your enemy to split up and defend their towers, the advantage to using this tactic is that the team who strikes first will always have the advantage. This can be a very annoying tactic to face due to the enemy disappearing as soon as you've arrived to deal with them and then attacking another location on the map.
Generally you'll see the team split into two groups, with one member moving between them or starting an assault on the third unoccupied lane, if you overcommit your force to deal with them, they'll punish you by attacking your tower, when done effectively it feels at though you're trying to catch water and understandably failing.
The obvious solution then is to not bother catching the water and to continue laning as you normally would, if you have three enemy players in one lane then have one teammate head over to assist, but otherwise have your standard 2-1-1-J setup and continue as normal. Split pushing relies on you to react to it or it becomes ineffective as you're quite comfortably farming your CP from minions whilst they're running all over the place losing out.
Laning or 2-1-1-J
Laning is the time honored MOBA classic, though it varies in some games the standard set up is to have a solo top lane, solo mid lane, a duo lane and a jungler. This works because it nets you the most XP/CP possible by comparison to all other standard tactics, you'll only see this tactic in most MOBA's because it's a lot more punishing to mix things up, but Paragon gives you options. The largest problem with laning is that you're vulnerable to Deathballing which creates us a very neat triangle of strategy and counters. Laning is the most balanced of the three and will give you the maximum income, which means it should be the go-to for most Paragon players when playing solo.
There are a couple of laning variations with Paragon, due to the freedom of choice when it comes to how you want to play, you might see 1-1-1-J-J where a support will go with your jungler leaving one person on each lane or 2-1-2 where you have no dedicated jungler but both sides will dip into the jungle for additional CP/XP. Both of these still constitute as laning and I imagine that things will settle down later into the games cycle.
To summarise
Laning > Split Pushing > Deathballing
This is the triangle as I currently see it, there is no best strategy as each has their own advantages and disadvantages but by keeping this in mind you'll know how to best deal with all situations.
The Future
This serves as the first implementation of this guide, I will periodically update and add more information to this as time progresses but I think there's enough here to warrant the first "complete" status. If you'd like to see anything added or disagree with something let me know and we can discuss it! :D
Change Log
23/05/2021 - Added maths to card selection section
20/05/2021 - Submitted guide as complete
- Added more information to the Jungle Timers section
- Accidently discredited card theory
Looks promising. Tell me when you are done for the frontpage
@George, Cheers I'll give you a shout when it's finished, still got quite a bit more information to add to this :)
@Kizr, deal
@George, I'm going to class this as complete v1 at the moment, will be adding more in the future but I think there's enough there for now :)
@Kizr, k. I'll push you to the front! Great job in keeping updates in this guide as well as in the others. I think we are foing to roll out our next giveway soon ;)
Blue works well with Sevarog as well as Red, Since he relies so Heavily on his Soul Stacks and for disabling the enemy with his snare. I love Blue
thanks for the guide learned a lot
I feel like no one should be allowed to play this game until they've read this guide. I knew 90% of stuff written here, but it was still informative and well-written. I highly commend you for your efforts!
I'm maining Dekker and, in most matches, I'm the only one setting up harvesters and placing wards. Also, explaining to people how to counter a deathball without proper in-game chat is damn near impossible.
Thanks for the guide. As pretty new MOBA player, I learned alot of the surface mechanics through osmosis, but this guide cleared up alot for me. Great Work! Thanks for the help.
Paragon is my first MOBA and I had no clue what any of this was. Arguably the best guide (written or video) that I've come across. Thank you very much for all the effort you put into this.
Hey kizr!
Many thanks for giving us such detailed insight in the game mechanics. I hope a lot of people will read it so the game experience improves.
One question though: how do you "give" orbs to your teammates?
@Dan Dutch, the only orb you can give - is the Orb Prime. You can drop it for your ally to take by pressing "Recall to Base" button and then cancelling it.
I just wanted to say thank you for taking the time to write this all out because it's been a massive help to me.
Paragon's my first MOBA that I've played and I've had zero idea what's been going on. Granted I've only played two rounds against AI, I didn't understand anything other than "kill things and destroy towers." Hopefully now I'll be able to have a solid impact with my team when I decide to brave actual PVP.
Again, thanks a bunch!
Dude, thanks to this guide i am constantly building cp3 Key's AND Wards and roam around the map to ward and keep most of times 4-5 gatherers running and empty. I dont know if this is called jungling but has since been the most reliable way of farming cp constantly. Running around with rampage or greystone prove to be best because of the jumps. Soon testing Aurora and serath with my Tactics.
For Any One That Likes Videos Here is Support Warding 101: https://youtu.be/J2MezsJHIy8